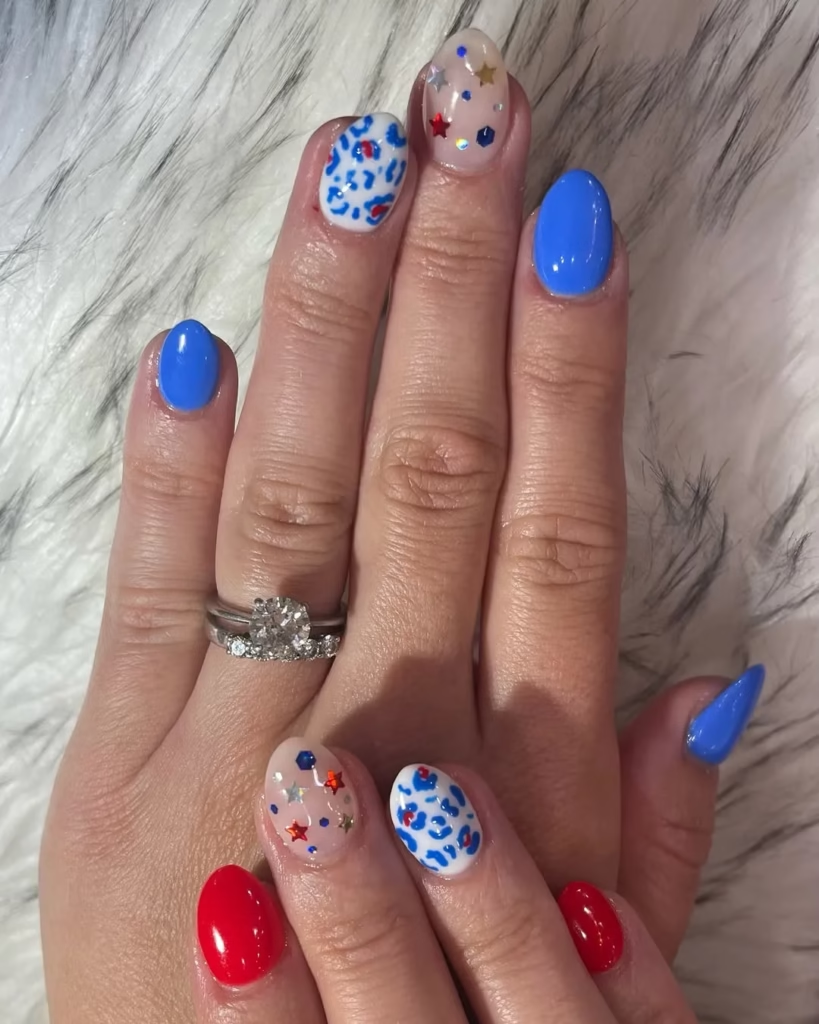
Patriotic Nail Art Ideas for a Sparkling 4th of July Look for an eye-catching 4th of July Look. This red, white, and blue nail designs round-up is great for getting into the American spirit winsomely. Whether you’re going to a firework display, BBQ, or watching the parade, here are 4th of July nails looks that will help you celebrate in style. Patriotic Nail Art Ideas for a Sparkling 4th of July Look From traditional star and stripes to sparkly touches or bold flag-inspired prints, there’s something for every taste here. From DIY designs you can do at home to more involved designs best left to the salon, these patriotic nail ideas are just the thing to kick off summer. Want a quieter nod to the holiday? and how about a stripped back, essentially minimal red, white and blue stripe over a neutral. Prefer something more eye-catching? Opt for glittery star decals, ombré color fades or full-on American-flag nails. Embellish with rhinestones or metallic polish for a festive 4th of July look. Not only are these nail ideas fun and festive, they’re a super fun way to get creative and make a statement. If you’re going for vibrant shades, sweet patterns, or simple and chic geometric shapes, these 4th of July nail designs are all that you need to complete your holiday ensemble. Pin now to save for your next haircut inspiration or color change. Patriotic Nail Art Ideas for a Sparkling 4th of July Look ideas are sure to make you feel fabulous, festive, and in the mood to celebrate the birthday of our country in the chicest way you can!
Glitter Nail Design

Glitter nail art designs are becoming more and more popular and many women love them. Whether you are preparing for a party, standing out for holiday, or just looking to step up your everyday look, glitter nails are sure to give you anything from a subtle flair to an attention-seeker. From a delicate sheen to a full-on, lively sparkly finish, there is a style for every personality and every event. Glitter Gradient / Ombre Nails The glitter gradient or ombre Effection nails are one of the most loved polish designs by many. It’s a simple, yet very stylish look anyone can do, even those of you who are not as skilled yet. And a firm favourite in the last few years - the accent nail; where just one or two nails on each hand are coated in glitter polish while the others remain a block colour – a chic and easy on the eye look. When you like daring elements, totally glittered nails is an impressive statement. Opt for fine glitter for a sleek, mirrored finish, or chunky glitter for extra dimension and shine. Sparkles can be done with polish, glitter dust in the loose or dust form, or gel for longer wear. Favourite colour choices are gold or silver glitter over black, rose gold on nude or multi-coloured glitter for a bright and playful finish. Glitter nail designs are fabulous for holidays and most of the girls apply glitter nail designs for a new year eve, birthday celebration, wedding, on parties or special night out. Glitter rides the line between hard and soft, no matter how you wear it, and lends magical qualities to any manicure. It’s ideal for all who want to shine — figuratively and literally.
Denver Nail Design
Denver nail design is a creative infusion of all things Mile High; America’s beloved wild west City! No matter if you’re into fashionable styles for the season or nature-inspired designs, or edgy urban art, the nail salons in Denver have taken to a variety of techniques and looks. From mountain-inspired designs to sleek minimalism, Denver nail art runs the gamut of both natural and urban beauty. One of the looks Denver residents are free to find is local landscape-inspired nail art, including soft blues and earth tones to represent Colorado’s skies and mountains, or small pine tree and snowflake details ideal for the winter months. For spring, go bold with florals, ombres inspired by sunset or vibrant colours of the day. Denver’s eclectic and artistic community also loves statement making nail art. There are lots of abstract patterns, geometric shapes, metallic accents, etc, especially in the more hipster or trendy areas . Many local nail artists mix gel, matte, chrome and glitter finishes to offer custom, one-off looks that represent a client’s personal style. Eco-friendliness is also a component of the Denver lifestyle, and many salons here carry non-toxic, vegan, and animal cruelty-free nail products, for those looking for a chic manicure that doesn’t compromise on personal values. From heading to a show in RiNo, to Sunday brunch in LoDo or hitting the trails Denver nail design allows you to showcase your individuality in style. It’s not just about fashion — it’s a way of life, creativity, and a little bit of Colorado charm on every nail.
Dip Powder Nails
Dip powder nails can last anywhere from 3-4 weeks all without chipping, leaving you with a perfectly finished manicure look, and is a long wearing and damage resistant mani option to the salon gel. Ideal for anyone who wants their nails to have that extra bit of strength and vibrant color without having to touch it up super often, dip powder nails are one of the hottest things in the salon and at home. With the dip powder method, the natural nail is coated with a bonding agent before dipping the nail into colored acrylic powder. This process is repeated a couple of times to strength and opacity and finished off with a sealing top coat. Dip powder doesn’t take a UV light to cure, so it is faster to apply than traditional gel nail polish, and the applications are typically gentler on your nails. Dip powder nails are available in a range of colors, textures, and finishes, from things like sheer pink or white for a more natural look, to bright neons, and sparkly glitters, to ombré shades that start one color at the base and gradually change to another by the tip. They’re also ideal for nail art, providing a hard canvas for intricate work like marbling, foil accents, or hand-painted designs. Dip nails are known for their toughness, making them perfect for anyone with an active lifestyle or anyone else who’s hard on their hands. Dip powder nails last longer too — generally a few weeks longer than gel or regular polish. But they also protect natural nails with added strength and durability, so they’re less likely to break or flake. And there are so many brands that have non-toxic formulas that are friendlier to nails and skin, now. Hint: Whether you need that sought-after, salon-quality finish or want an effortless, at-home option, dip powder nails provide the professional look you crave with the strength, style and staying power to match!
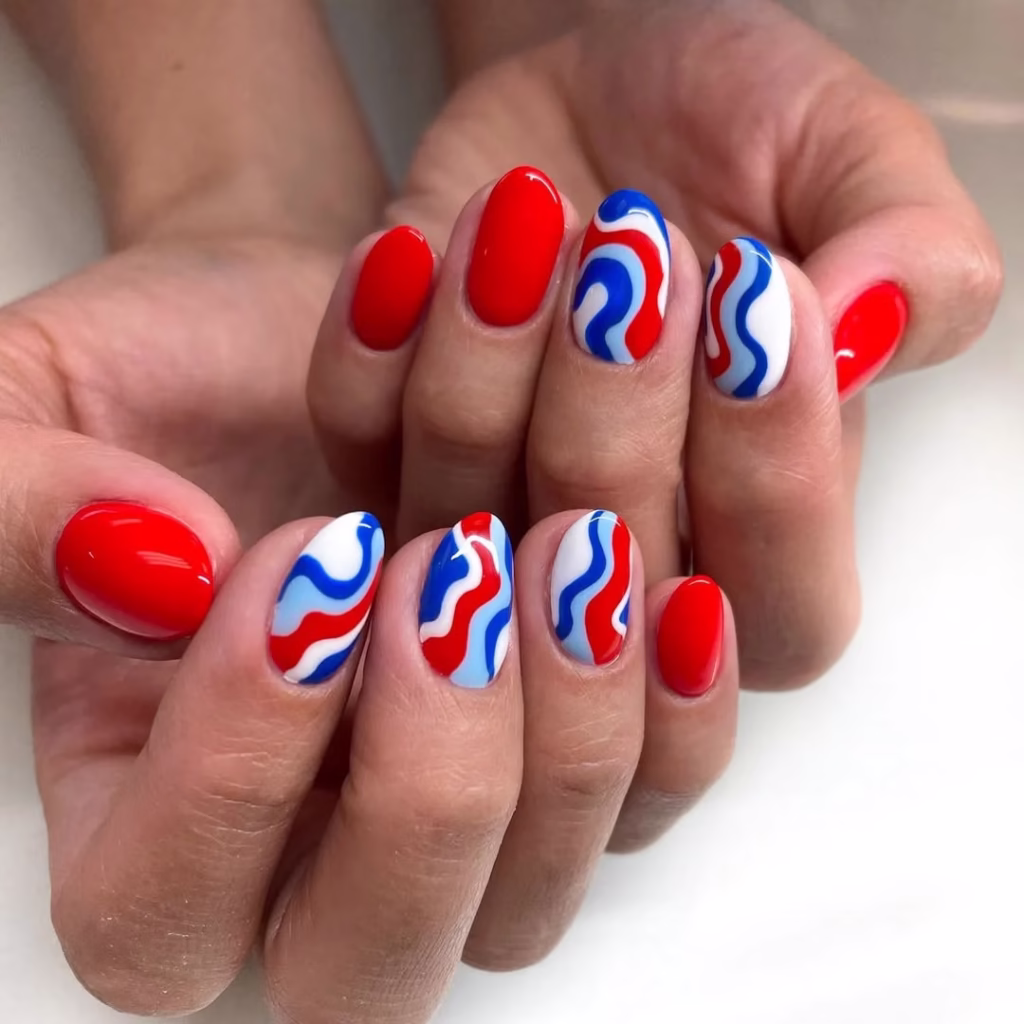
Swirls Nails
Swirl Nails for 4th of July Swirl nails for 4th of July are fun, festive and stunning ways to celebrate Independence Day in style. Never tangle with the great curl of carousel cartilage that wraps your dolls up and makes them every which way. Whether you’re headed to a barbecue, fireworks showcase or beach bash, 4th of July swirl nails allow you to show off your American pride in style, and with flair. Swirl nail patterns typically feature flowing, abstract designs that resemble the movement of fireworks or the flow of a flag. Execute those swirls in patriotic hues and they make a spectacular homage to the holiday. You can make the lines as bold as you like with thick and high contrast or a muted marble look by lightly mixing the colors to a dreamy watercolor effect. Glitter, metallic accents or tiny stars will give some extra shine and dimension. Before the 4th of July, patriotic swirl nails can be attained at home with a few nail brushes, dotting tools or simply a toothpick. Gel polish is particularly great for the swirls, as you have more time to work the colors before they cure. Swirl placement is up to you, full nails, accent nails, or just tips as a fun little twist. These nails go so well with your holiday dress and make your look all festive. Whether you go bold and dramatic or soft and swirly, those 4th of July swirl nails are a cool way to celebrate freedom, fun and fashion — all at your fingertips.
Faded Glory Nails
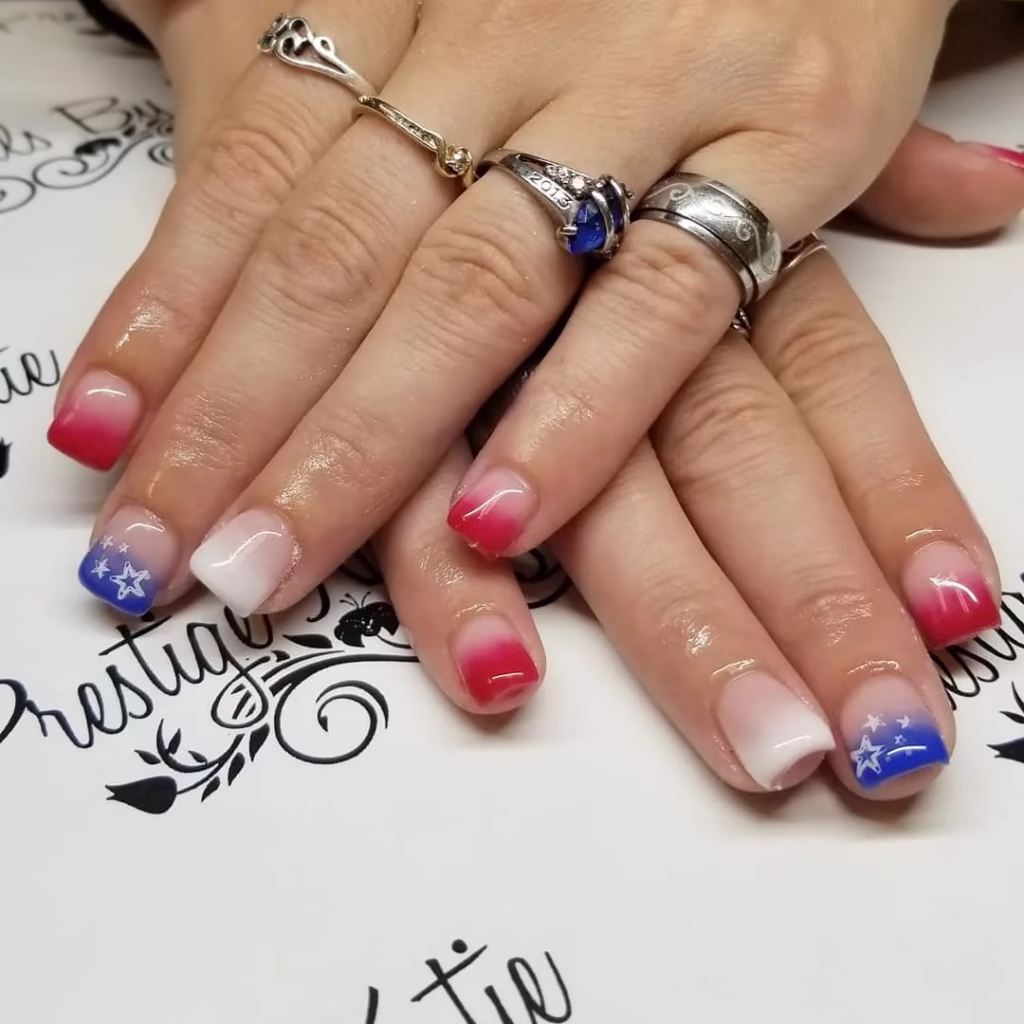
Faded Glory nails are a fashionable yet retro way to pay the 4th of July – combining vintage Americana with trendy nail art. Featuring soft, worn-in shades inspired by the iconic red, white and blue of the American flag, the Muted Glory nail designs evoke the timeless American spirit of freedom, heritage, and pride. They’re just right for someone looking for a patriotic manicure that has a little bit of charm and class. This design often comes in muted red & blue tones along-side creamier whites and occasionally a metallic or gold to roughen it up. The shades can be blended in gradient fades, used ombré-style, or even pounced on with a sponge for that weathered, vintage flag effect. Designs could be stars and stripes, or swirls, with a faded, gently distressed edge, suggesting a “glory days” look. The Faded Glory nails are perfect for short and long nail sets and look great for both matte and satin topcoats to enhance the vintage feels. You can also apply a hint of glitter, foil, or star decals for a fresh feel of the old-school vibe. For barbecues, parades, fireworks and beyond, these 4th of July nails cover all the bases when it comes to being subtle — and not so subtle. Whether you are declaring your love for the U.S.A. or are simply loving the look that is distinctly American, Faded Glory nail art nails, have”nailed it” when it comes to mixing fashion with patriotism in a bold new way. They’re a great foil to denim, boots and the open air of summer gatherings.
Floral Patterns Nails
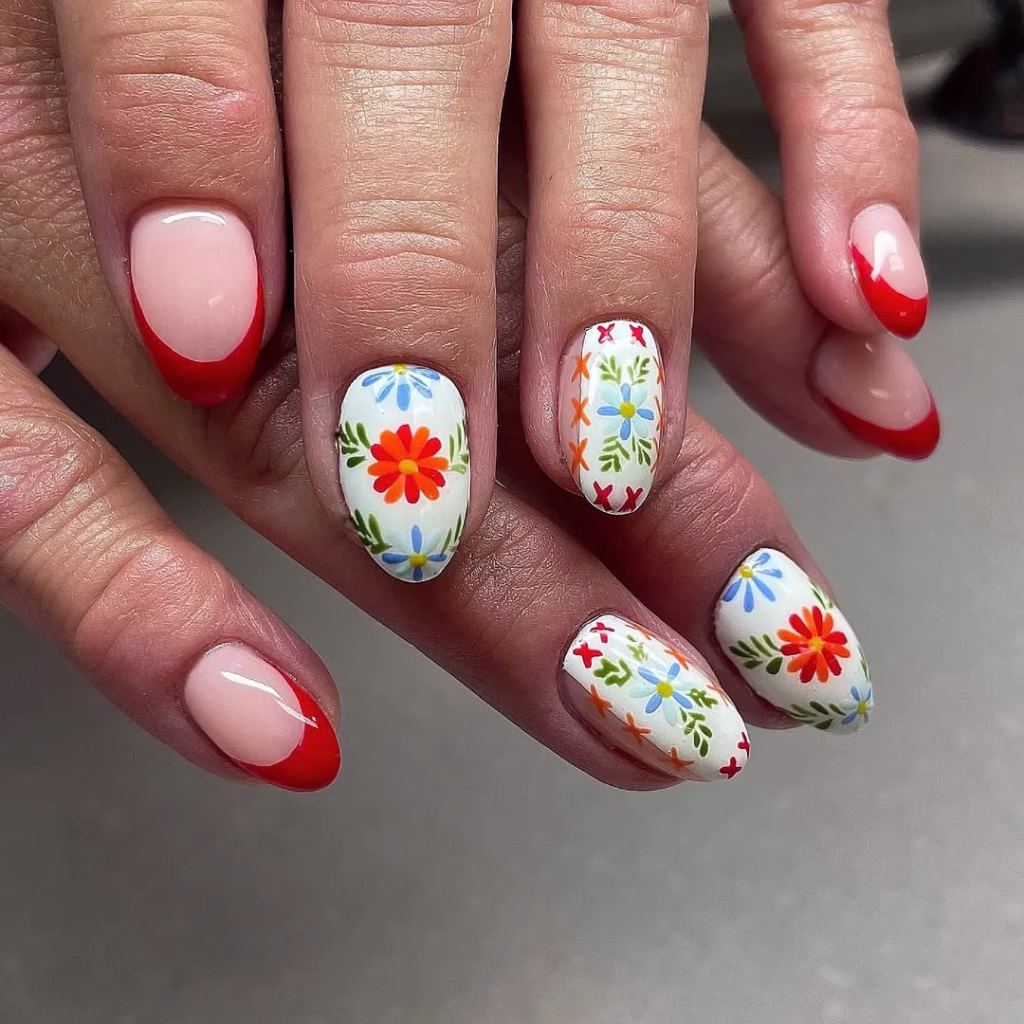
These floral pattern 4th of July nails are a cute and pretty update to old fashioned patriotic nail designs. Independence Day colors come to life with bold, red, white, and blue hues that are paired to create a festive yet elegant look. Great for summer parties, BBQs, and fireworks shows, this design is just a little fancy extra to your patri-optic outfit. To make 4th of July floral nails, first laying down a base in the holiday’s classic colors — maybe a dark navy or a bright white? Then light red, white, and blue tiny flowers with nail art brushes or dotting tools. The flowers can be spread all over the nails for a statement bouquet, or served as accents on a nail or two for a more minimal vibe. And you can intersperse silver or glittery centers for extra sparkle, like fireworks. This nail design works well alongside other patriotic motifs such as stars and stripes. For instance, try a daisy garden with an accent nail of stars to go along with it, or have some faded stripes under the floral art. These looks are beautiful whether with a matte or glossy finish, and can be executed in regular, gel or press-on nails. Floral 4th of July nails If you’re hoping for a softer, more romantic take on patriotic style, floral 4th of July nails might be the best option. They pay homage to summertime’s natural gorgeousness yet still pay tribute to the red, white and blue. At a picnic or while watching fireworks, floral pattern nails can make your holiday look feel floral, season-appropriate and like you.
4 th july Cherry Nails
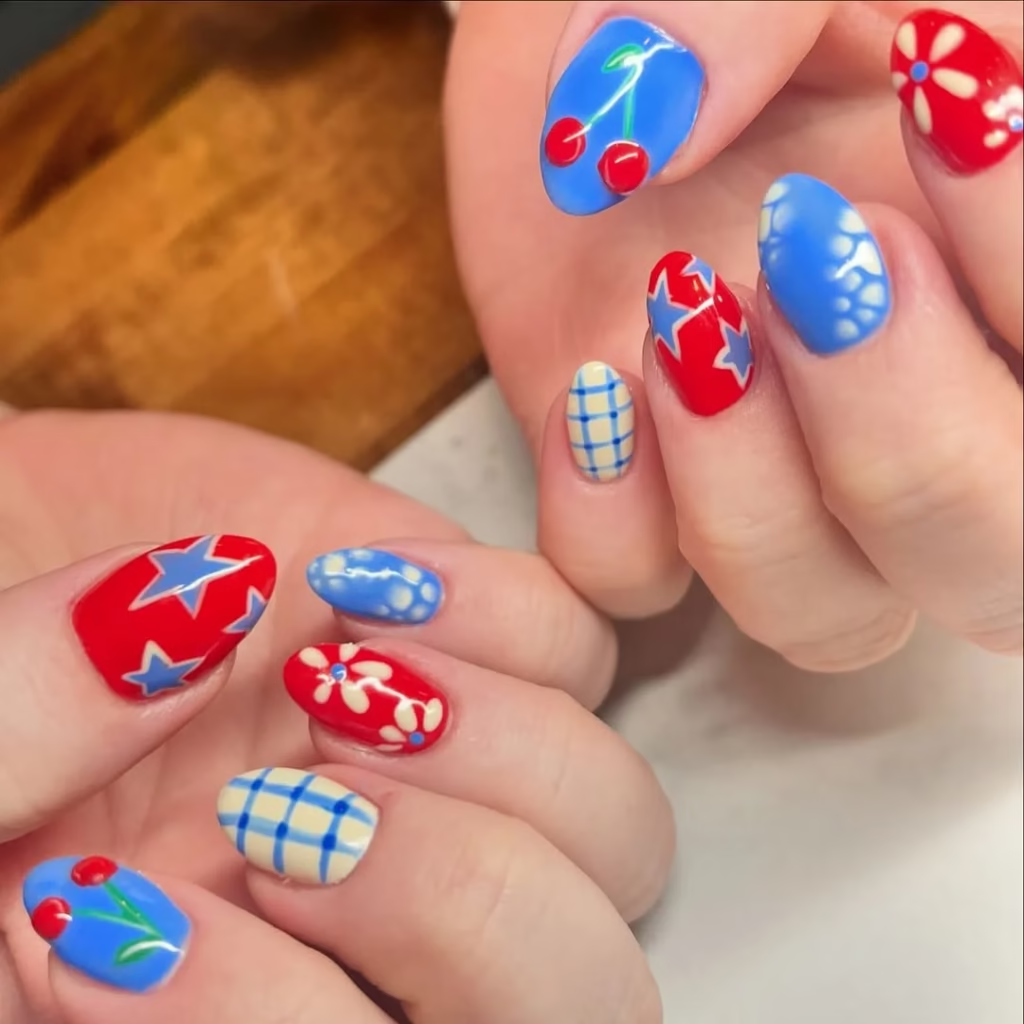
4th of July is one heck of a colorful celebration here in the USA- full of fireworks, grilling, and, of course, epic nail art! Invisible gloss Cherry nails One of the latest trends that reflect this spirit is the cherry nails trend: The classic cherry symbol mixed in with the equally timeless red, white, and blue. This nail design is one for infusing summer with ladylike charm and it has a fun edge for any Fourth of July celebrations. Here is how to get this perfectly patriotic Cherry Nails for 4th of July For my patriotic nails I choose red as a base coat that is to represent brave spirit of the nation. Once the base layer is dry, artists frequently add playful white accents, such as stripes or polka dots. The cherry image can also be painted with a fine brush or a dotting tool, with red cherries and green leaves, To create a refreshing and energetic look. Adding in blue details, such as small stars or a glitter gradient, can take that patriotic theme and make them the next best thing to a party for American independence. The nail art isn’t just for fun, it’s for fun even while dispensing with fun, and a device for self-expression and individuality on a festive day. So whether you DIY at home or take a trip to your nail salon, Cherry Nails are a fun and festive way to make a statement at any 4th of July celebration. On this day of fun, make sure to decorate your nails with a design that exhibits both your style and Halloween’s fun spirit!
Red White and Blue Nails
With the fourth of July just around the corner, citizens wang to show the patriotic with red white and blue and nails art are great ways to do it. This colour scheme pays homage to the American flag but gives off the party vibes that comes with the 4th of July. From the traditional and classic to the spectacular and modern, the design options are limitless, providing freedom for you to infuse your creativity, celebrating in a way that is uniquely you! To get gorgeous Red, White, and Blue Nails, you’ll need to use a base coat to save your nails from the abuse, and then add a bright red polish for brightness. When the paint is dry you can add white details – my daughter added white stars/stripes from paper glued on or vinyl stickers for the USA flag look. You can simply do it with a sponge, by blending red and blue hues for pretty ombre combination. Embellishments like glitter or metallic finishes can take the design up a notch, making it sparkle for the party season. Fireworks, flags, or even small hearts to represent love for one’s country are great for anyone looking for something a little more detailed. Nail art stickers or stencils, for example, can help make this a little easier for novice nail artists to pull off at home. Whether at a backyard BBQ or watching some fireworks or having a family picnic, Red, White and Blue Nails are a fun way to get everyone in the spirit of the 4th of the July and what that means to this country.
Gel Polish Nail Art
Gel Polish Nail ArtCelebrating Independence DayFrom the durability, vivid colors and gloss finish, gel polish nail art has stolen the spotlight to help celebrate the 4th of July. This nail art is perfect for the holiday and will help show off your patriotic pride with a design that will last. With the correct methods and some imagination, gel polish can make regular nails into beautiful works of art as pretty as the swing of sparkling sparklers of the 4th of July. To make the perfect patriotic 4th of July nails with gel polish, begin by prepping your nails with a tidy base coat for a flawless application. Red, white and blue are the official colours of the ad. An old-school look might have a red base with white stars and a blue stripe. For a more lively appearance, you can also choose not to blend and have a gradient of three colors. For detailed designs gel polish works best as it cures quickly under UV or LED light, so you’re able to paint your nails without smudging. You could sweeten things up with festive touches like fireworks, American flags or even cherries. These designs can easily be made with nail art tools such as brushes and doting tools. The shine of gel polish not only makes the colors more vibrant, but also gives them a professional finish. Whether you’re going to a BBQ, watching fireworks, or walking in a parade, Gel Polish Nail Art will provide you with a fun, unforgettable way to accessorize with your nails that honors the spirit of the 4th of July!
4 th july Patriotic Nails
4th July Patriotic Nails Independence Day is here and what better way to prove your patriotism than with some colorful nail art to match the festivities. The holiday itself is associated with red, white and blue, and brings visions of the American flag to mind as well as a feeling of patriotism. By donning these shades on your nails, not only will you be lent a touch of frivolity to your holiday look, but you can also display your true colors while celebrating everything from barbecues to firework shows. For gorgeous patriotic nails, you’ll want to begin with a layer of base coat for protection, and then select your primary colors. Options for the theme would be to do a plain solid red, and white, or blue background and use them to create stars, stripes, polka dots. Nail art processes like sponging can combine the three paint shades for some sexy nail art ombre. Furthermore some nail stickers or stencils will enable you to get ornate designs with little effort. If you like a bit of creativity, add some themed elements like fireworks, eagles, and abstract designs that reflect the jolly mood of the holiday. A glitter polish may also be used to add some pop so that your nails look sparkling in the light. Whether you prefer simple or complex designs, 4th of July Patriotic Nails are an amazing way to show the world your holiday creativity.
July Berry Nails

July Berry Nails are a fun and fashionable way to celebrate summer and July, when the berries are ripe for picking! Siobhan And this mani merges fruity inspired colours with cute designs and is the ideal manicure for any summer BBQ or sun-soaked day in the park! Berries like strawberries, blueberries, and raspberries Have you ever thought that their vibrant colors can be recreated to form an artistic piece on our nails and represent both creative talent and admiration for the gifts of nature? To get just the right July Berry Nails, start with a clean base coat to cover your nails. Opt for a fresh-berry inspired palette – we’re thinking rich reds, hot pinks and royal blues work wonderfully. For example, a traditional or classic choice may involve solid color nails that are a juicy strawberry red with white polka dots to mimic berry seeds, or small blue or purple designs that resemble blueberries or blackberries. For some extra impact, use nail art brushes or dotting tools to paint adorable little berry pictures – complete with green leaves, for a fresh finish. You can add sprakles or metallic finish to make it a bit fancier and which can also double as dew on fresh berries and gives a beautiful reflex on nails. If you’re on your way to a summer fest, a beach day, or weekend brunch, July Berry Nails are a fun, fashionable way to celebrate the season, and let your unique pizzaz shine right thru. This bright and fun nail art is a fun way to embrace summer and bring extra whimsicality and cuteness to your style!
4th of July Tie Dye Nails
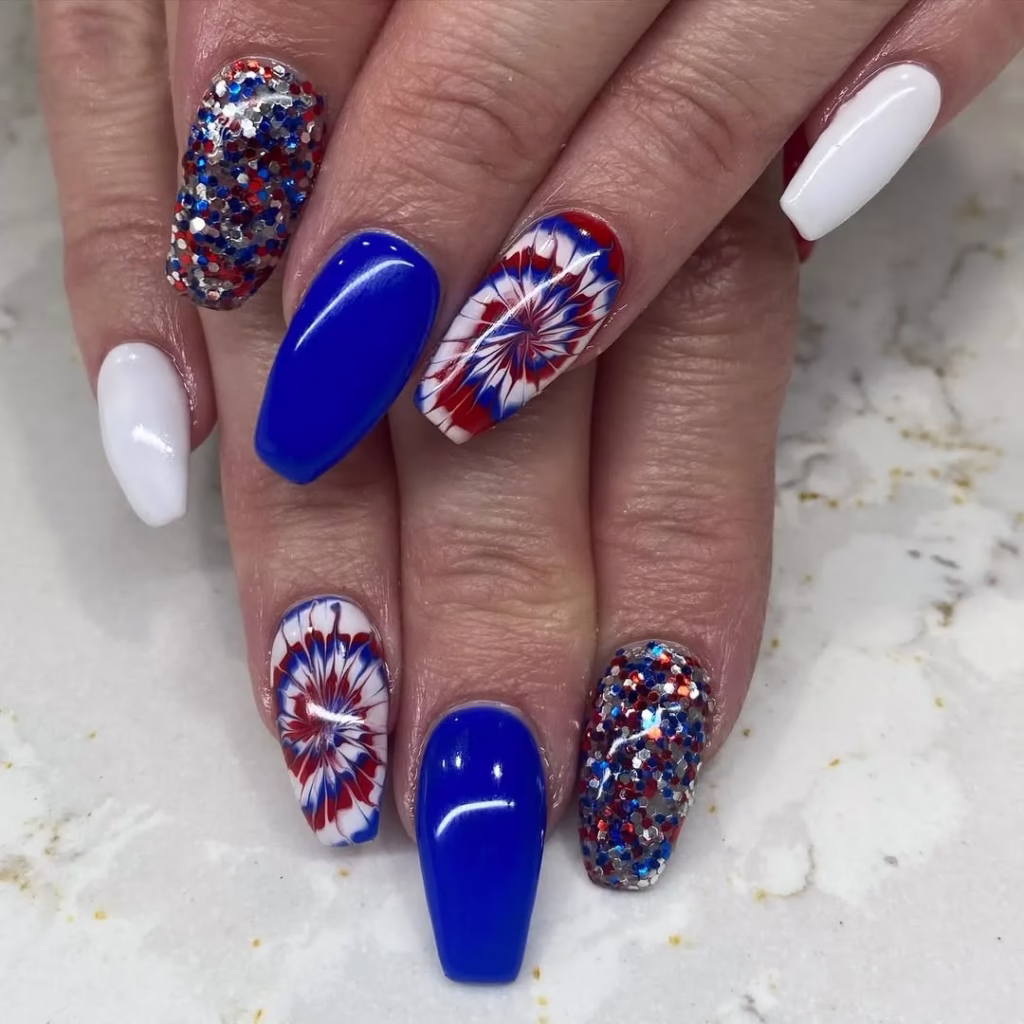
4th of July Tie Dye Nails Bring some youthful summer spirit to your mani with these quirky and vibrant tie dye designs! This nail design screams summer and freedom and uses the iconic red, white and blue from the American flag in a funky and fun way. Not only is the tie-dye process super on-trend, but it also offers infinite customisation opportunities, so it’s ideal for anyone who wants to express themselves during the seasonal merriment. To make amazing 4th of july nail designs First apply a base coat to protect your natural nails. Emphasize bold hues of red, white and blue as your main colors. Start with a strong, opaque white base colour of polish, to let you tie-dye design really stand out. Then take a sponge or a small brush and apply blops of red and blue all around in a random pattern, swirling the colors a bit with the brush to give the tie-dye effect. This method replicates the swirls and marbling you’ll get with the old school tie-dye fabric process, and is a cool spin to the average nail art. Top it off with a clear, glossy top coat for some extra umph of shine and to protect your masterpiece. Small add-ons like stars or sparkles can enhance your tie-dye nails even further, or make them patriotic. Whether celebrating with a barbecue, fireworks or a gathering of friends, 4th of July Tie Dye Nails are a great way to add a splash of color to your day and evening for a festive look bursting with fun!
4th of July Acrylic Nails
4th of July acrylic nails are a fabulous way to celebrate the nation’s birthday and all those “rockets red glare” and “bombs bursting in air,” all while showing off your personal style with beautiful patterns and colors. Acrylic nails are so durable and versatile that a lot of women often make it during the hot summer season. When red, white and blue come together, and apart: When red, white and blue saw each other: When the Fourth of July made red, white, and blue: It wasn’t so ideal: These colors don’t run: And when they added some stars: And when they re… For fabulous 4th of July Acrylic Nails, begin by selecting a nail shape that you love, including, stiletto or coffin or square. A warm red or deep blue works well for over all base. So many options from here! White stars, stripes or abstract accents can be there. Or, for a more fancy look, use nail art tools to add more intricate designs like fireworks or American flags on a few accent nails. Whoreal: If you’re also sleuthing for the type of polish that’s suitable for news year’s nails, the addition of glitter or a metallic finish can help to ensure a festive shimmer that ups the celebratory ante. Many nail technicians also add in 3D elements — such as rhinestones or charms — to take your design to the next level. Whether you choose a dramatic look that gets all the attention, or if you are looking for something a little more subtle, 4th of July Acrylic Nails are a great way to show off your love for all things patriotic and be at your best as you get out and enjoy the fun that comes with celebrating the holiday. When paired with the perfect design, your nails can serve as an accessory when you’re clutched up for the holidays with friends and family!
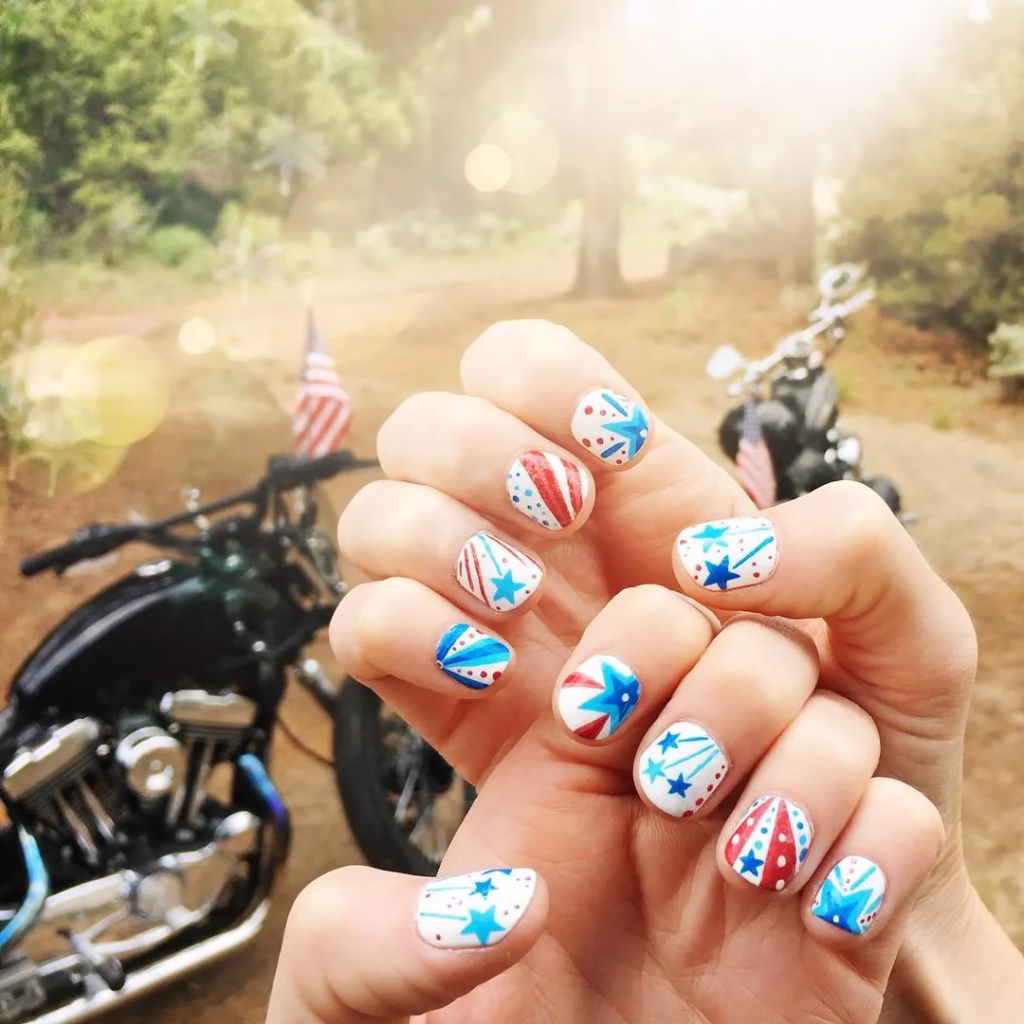
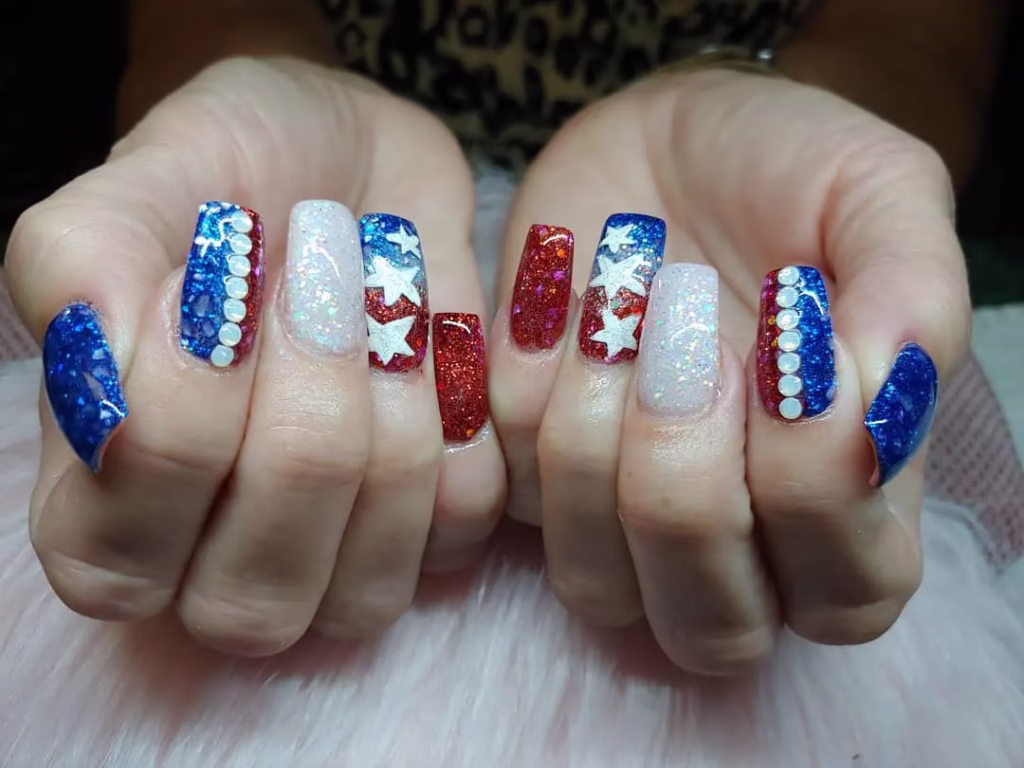
Star Sprinkle Nails
These Star Sprinkle Nails are a fun and festive take on the 4th of July, it’s traditional American star motif with a sweet twist. In this nail art, we are taking inspiration from the holiday’s red, white, and blue color scheme, but injecting a bit of fun with an eye-catching element that shows off the spirit of celebrating Independence Day. The star pattern is not only for the stars on the American flag but also the symbol reflects the spirit of hope and freedom, and this patriotic style is the best choice. To Get Perfect Star Sprinkle Nails: Begin with clean nails, apply a base coat to ensure your nails from yellowing and to help the polish adhere to your nail. Pick a holiday color and let it pop – bright blue or bright red work well for Hanukkah. If the base color has dried, apply a coat of white polish or a clear top coat to lay a foundation for the stars. Using a teeny nail art brush or even a dotting tool, paint or dot tiny stars in a variety of sizes all over the nails. For a sprinkle effect, you can also try star-shaped glitter or nail sequins that grab the light and add dimension. To make the festive look even more fun, add small details such as stripes or polka dots on some accent nails. Finish with top coat for long-lasting art and shine. Get festive and fun with Star Sprinkle Nails! Your nails will be a hit at any 4th of July party They’re festive and fun—the perfect accessory for all of your 4th of July plans!
Hat and Boot Nails
Hat and Boot Nails This is a cute and fun nail art design, perfect for the summer fun, country or bohemian life. This zany nail design unites symbols that include cowboy hats and cowboy boots that can represent adventure, play and a free lifestyle. This design has a lot going on so you can always change the look, perfect for the people that don’t want to be tied to one design, I would say that this is also for that free spirit type of person that is coming up with a free designs with all of the bold colors. To obtain the perfect Hat and Boot Nailz, begin with clear and polished base coat to prolong the life of your design. Select a brilliant color for the palette that fits the theme—browns and tans are good for the boots, brights for the hats. Since the look is so intricate, you don’t need to replicate it on every nail – paint each nail with a different element of the design; have one nail as a detailed cowboy boot with fancy stitchwork, while another might be a fancy hat with adornments filled with ribbons or flowers. You could even add some fun details for even more personality, such as stars, wildflower-like shapes, or other rustic accents that say country or outdoor. Using tools like fine brushes or dotting tools will enable you to make intricate designs. Lastly, top your artwork off with a coat of gloss for an added shine. Whether you’re going to a country concert, a pool party, music festival or just wanting to show off your fun style, Hat and Boot Nails are a cool, fun way to showcase your love of fun and your free spirit!
Fire Nails

Fire Nails Fire Nails are an attention-catching and highly dynamic nail art that encapsulates the fun and vigor of the 4th of July fire up. This type of nail art design looks fantastic and reminds us of fireworks and the impressive shows in the night sky during Independence Day. Fire nails are fun, with lots of reds and blues so you can show off your personal style as well as your love of the Fourth of July and all that it represents. How to get fabulous Fire Nails Begin by applying a clear base coat to your nails to protect them as well as prolong the wear of your design. Opt for a dark base, such as navy blue or black, to emulate the night sky that makes the perfect canvas for these fiery designs. The base should be allowed to dry first and then, use a range of fiery colors such as red, orange and yellow to create flame-like designs. Sponge/Swirl: You can use techniques like sponging or swirling to get a gradient look that mimics the flickering flames and sparks of fireworks. You may even want to use a fine brush to paint small stars or sparkles around the flames for added detail and further put across the party spirit. Just like how nail art tools can help you do complicated designs, inspired by fireworks, there are things that help make your nails appear as fireworks displays. Complete the look with a slick top coat to protect your design and add some sparkle. No matter if you’ll be viewing fireworks, going to a backyard BBQ, or just hanging out with friends, Firework Nails are a fun, festive way to show your love of America and have some fun with your nails!
Hand Painted Nail Art
Unleash your creativity this Independence Day with hand-painted nail art that beautifully embodies the essence of the 4th of July! This design enables you to customize your nails with intricate details, transforming them into a genuine expression of your patriotic pride.
To start, choose a base color that symbolizes the holiday—deep blue, bright red, or even a classic white. Apply a base coat to safeguard your nails, then paint two layers of your selected color, ensuring each layer dries thoroughly. Once the base is prepared, it’s time to unleash your artistic flair!
Utilizing a fine-tipped nail art brush, you can craft breathtaking designs such as fireworks, stars, or even the American flag. For fireworks, begin by painting small bursts of color emanating from a central point. Employ white and gold for a shimmering effect, and feel free to layer colors for added depth. For stars, simply dip a small brush or dotting tool into white polish and apply them randomly across your nails.To enhance the festive atmosphere, consider adding glitter or metallic accents that reflect the light. This will provide your nail art with an additional sparkle, ideal for celebrating beneath the night sky during fireworks displays.Conclude your design with a glossy top coat to secure your artwork and amplify the shine. Hand-painted nail art not only highlights your artistic abilities but also makes a striking statement at any July 4th celebration. Relish the festivities and allow your nails to mirror the joy of freedom!
Festive Fireworks Nail Art
Celebrate Independence Day in elegance with festive fireworks nail art that embodies the essence of the 4th of July! This lively nail design is ideal for expressing your patriotic spirit while infusing a bit of creativity into your summer celebrations.To create this eye-catching appearance, begin with a base coat of deep navy blue or crimson red to symbolize the colors of the American flag. After the base has dried, utilize a fine nail art brush or a dotting tool to craft fireworks patterns. For the fireworks, choose vibrant colors such as white, silver, gold, and various shades of red and blue.
Start by making short, curved strokes radiating from a central point to replicate the burst of fireworks. Layer different hues for a more vibrant effect, allowing each layer to dry before applying the next. To elevate the festive appearance, you may also add small stars or sparkles around the fireworks using a glitter polish or gold foil.Conclude with a glossy top coat to protect your artwork and enhance its shine. This nail art not only appears stunning but also conveys your affection for your country. Whether you are participating in a barbecue, enjoying a fireworks show, or simply spending a day out, these festive nails will undoubtedly make an impression.
Allow your creativity to flourish and relish the festivities with this brilliant July 4th nail art that genuinely captures the joy and excitement of the holiday!
19.Glittery Fade Nail Art
Enhance your Independence Day appearance with a captivating glittery fade nail art that embodies the enchantment of 4th of July festivities! This exquisite technique merges the patriotic hues of red, white, and blue with a glamorous gradient glitter effect, ensuring your nails are nothing short of spectacular.Start by preparing your nails with a clear base coat to safeguard and smooth the nail surface. Select a gradient of patriotic colors: begin with a deep navy blue at the base of the nail, transitioning to a crisp white in the center, and concluding with a vibrant red at the tips. The secret to achieving a flawless fade lies in blending techniques utilizing a makeup sponge or a specialized nail art sponge. Glitter Application Technique: Employ fine glitter in silver, holographic white, and red. Gradually apply glitter, focusing more on the tips and creating a softer fade towards the cuticle. Layer various sizes of glitter for a multidimensional effect. For added flair, consider designing an accent nail with more pronounced glitter coverage or a complete patriotic flag motif. Holographic glitters are particularly effective, reflecting light and producing a stunning effect that resembles fireworks. Seal your design with a thick, clear top coat to smooth the glitter and impart remarkable shine. This technique not only appears festive but also delivers a professional-looking finish that will endure throughout your July 4th celebrations. The glittery fade nail art is ideal for those wishing to blend elegance with patriotic spirit, crafting a look that is both refined and celebratory. Your nails will undoubtedly shine brightly like the fireworks illuminating the summer sky!
Simple Star-Spangled Nails
Celebrate Independence Day with simple star-spangled nails that elegantly capture the spirit of the 4th of July! This nail art design is not only straightforward to execute but also enables you to express your patriotic enthusiasm in a fashionable and stylish manner.
To begin, prepare your nails with a clear base coat to ensure a smooth surface and protect them from discoloration. For the base color, choose a classic crimson red, bright white, or deep navy blue—each symbolizing the colors of the American flag. Apply two coats of your selected base color, allowing each layer to dry thoroughly.Once your base is prepared, it’s time to add those iconic stars! Utilizing a fine nail art brush or a dotting tool, create small stars on each nail. If you’re feeling bold, alternate the colors of the stars between white and blue or red, forming a playful and festive pattern. Alternatively, you can use star-shaped nail stickers for a quicker solution.For an additional flair, apply a layer of glitter or metallic polish over the stars to enhance their visibility. A holographic top coat can provide a stunning finish that reflects light beautifully. Finalize your look with a glossy top coat to seal your design and amplify the shine. This simple star-spangled nail art is ideal for any July 4th celebration, whether you’re attending a barbecue, fireworks display, or simply enjoying a day with friends and family. Your nails will serve as a charming homage to freedom and fun while maintaining your style effortlessly chic!
Copper Claws Dips Nails
Prepare to dazzle this Independence Day with Copper Claws Dips Nails, a fashionable and striking nail art design that brings a touch of sophistication to your July 4th festivities! This distinctive nail technique not only delivers a breathtaking finish but also guarantees durability—ideal for celebratory events.To achieve this look, begin by preparing your nails with a clean and shaped foundation. Apply a clear base coat to safeguard your natural nails. Select a copper dip powder that captures the warm, radiant tones of summer. The deep, metallic shade complements patriotic colors beautifully and adds an elegant twist to your holiday nails.Once your base is dry, utilize the dip method: apply a bonding solution followed by the copper dip powder. Gently tap off any excess powder and repeat the procedure to reach the desired intensity. After your nails are coated, seal the design with a clear top coat to provide a glossy finish and enhance the metallic luster.
For an extra touch, consider adding stars or stripes in red, white, and blue using nail art brushes or stickers on one or two accent nails. This will create a stunning contrast and a festive element that honors the spirit of the 4th of July.Conclude your design with a final layer of top coat to secure everything in place. Copper Claws Dips Nails are not only visually captivating but also embody the celebratory spirit of Independence Day, making your nails an ideal accessory for any summer gathering or fireworks display. Enjoy the celebrations and let your nails shine brilliantly!
Temecula Nails
Celebrate the joyous spirit of Independence Day with Temecula Nails, a stylish and lively nail art design that beautifully enhances the July 4th festivities! Drawing inspiration from the stunning landscapes of Temecula, California, this nail art merges earthy hues with striking patriotic colors, offering a distinctive twist to your holiday appearance.To begin, prepare your nails by shaping and buffing them to achieve a smooth surface. Apply a clear base coat to safeguard your natural nails. For the base colors, opt for a classic deep navy blue or crimson red to symbolize the American flag. Apply two coats of your selected color, ensuring each layer dries completely.Next, introduce your Temecula-inspired elements! With a fine nail art brush, craft rustic designs using earthy shades like soft taupe or sandy beige. You might consider painting delicate vines, leaves, or subtle floral motifs for a nature-inspired flair—these can be applied over the base color or on accent nails.To incorporate the patriotic essence, add small white stars or stripes in red and blue on a few accent nails. A dotting tool can assist in creating perfect star shapes, while striping tape is excellent for achieving clean lines.Conclude your design with a glossy top coat to seal everything in and enhance shine. The Temecula Nails design is not only festive but also highlights your creativity, making it an ideal choice for any July 4th celebration. Revel in the festivities while showcasing your unique nails that embody both patriotism and stylish elegance!
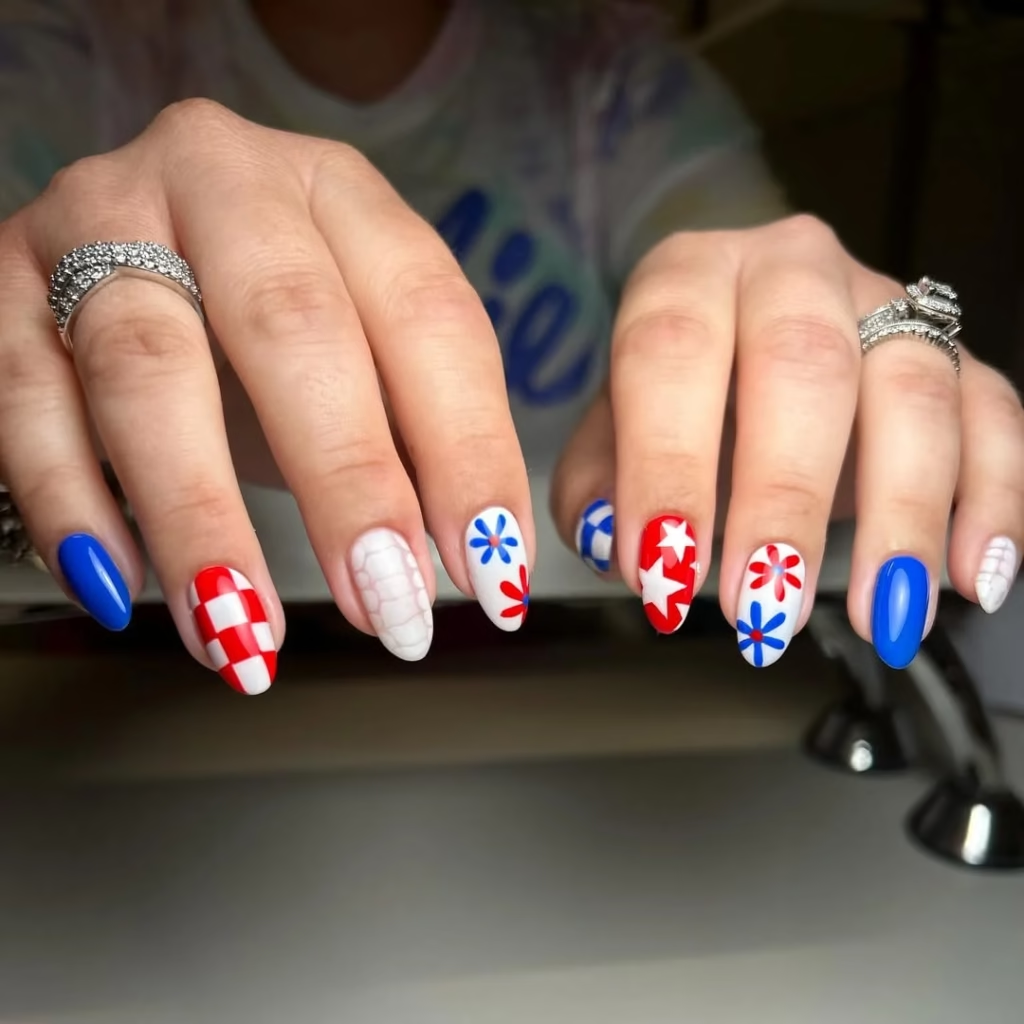
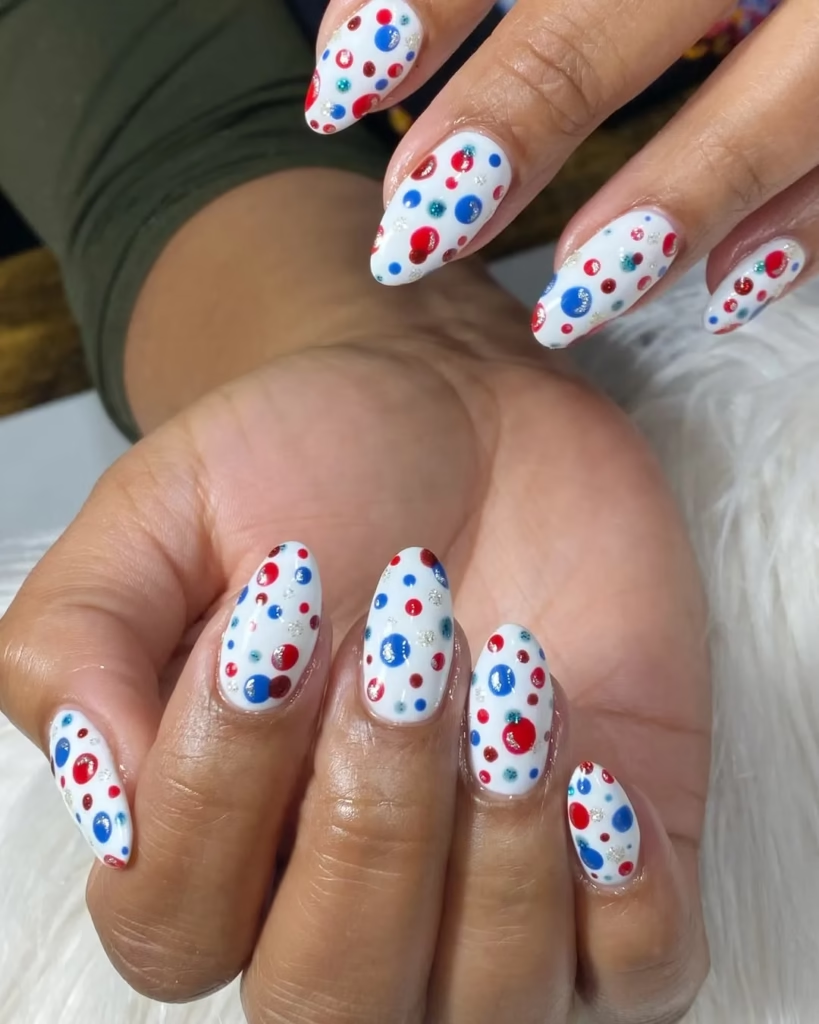
Polka Dot Print
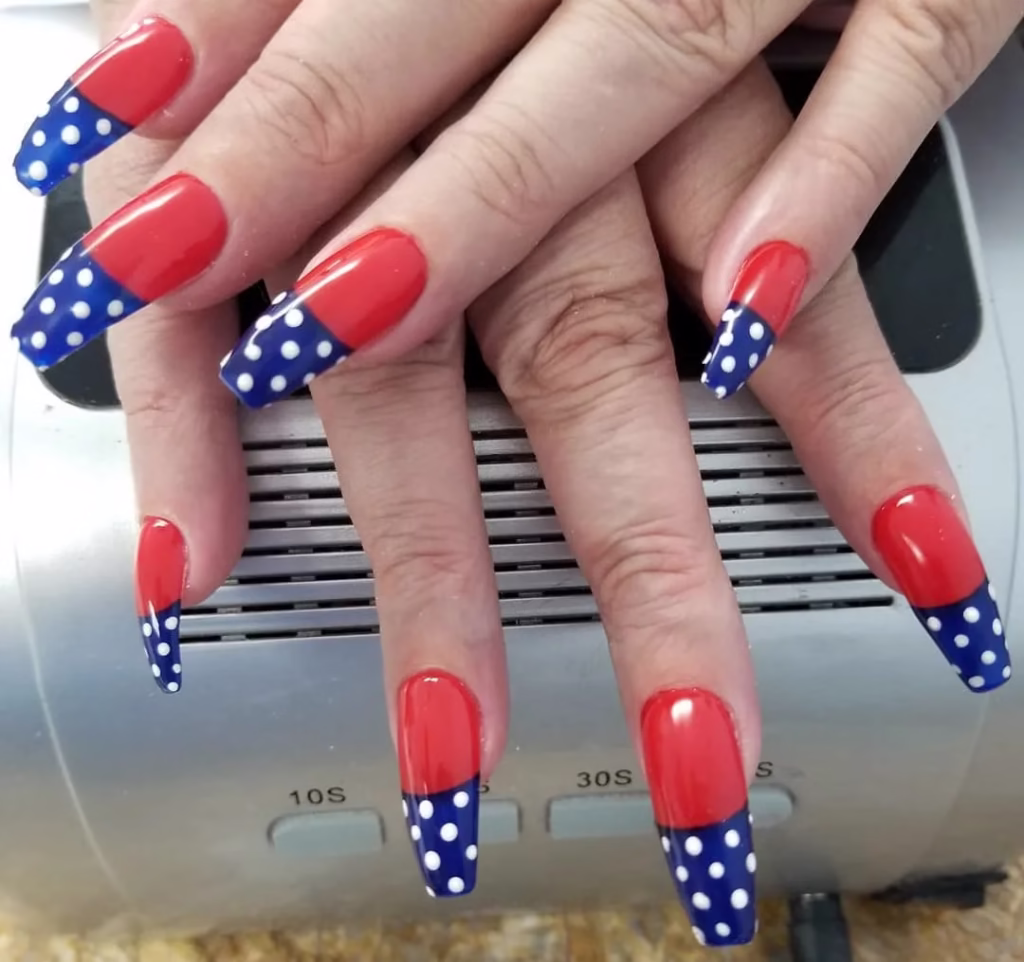
Celebrate Independence Day in a delightful and whimsical manner with Polka Dot Print Nail Art! This vibrant design is ideal for expressing your patriotic enthusiasm while ensuring your nails remain fashionable and celebratory. The polka dot motif is not only simple to execute but also infuses a joyful atmosphere into your 4th of July celebrations.
To start, prepare your nails by cleaning, shaping, and buffing them to achieve a smooth finish. Apply a clear base coat to safeguard your natural nails. For the base color, opt for a classic white or light blue that provides an excellent canvas for your polka dots. Apply two coats of your selected base color and allow them to dry thoroughly. Once your base is dry, it is time to add the polka dots! Utilizing a dotting tool or a fine nail art brush, create dots in red, blue, and white. You may choose to alternate colors or form clusters of dots in various arrangements. For a more dynamic appearance, vary the sizes of the dots—combining small and large dots can enhance visual appeal. For an added touch of glamour, consider applying a layer of glitter polish over the dots or using metallic shades for a shimmering effect. This will provide your nails with a festive sparkle that embodies the essence of fireworks illuminating the night sky. Conclude your design with a glossy top coat to secure everything and amplify the shine. Polka Dot Print Nail Art is a delightful and festive method to showcase your patriotism while maintaining a playful and fun style this July 4th! Relish the festivities and allow your nails to dazzle!
Cherry Nail Art
Infuse a playful and fruity element into your Independence Day celebrations with Cherry Nail Art! This charming design merges the classic red of cherries with a fun and whimsical aesthetic, making it an ideal selection for the 4th of July festivities. It not only highlights your creativity but also captures the vibrant essence of summer.To begin, prepare your nails by shaping and buffing them to create a smooth surface. Apply a clear base coat to safeguard your natural nails. For the base color, a gentle white or pastel blue provides a beautiful contrast against the striking cherry design. Apply two coats of your selected base color, ensuring each layer dries thoroughly, Once your base is dry, it’s time to paint the cherries! Utilizing a fine nail art brush or a dotting tool, create small red circles on your nails to symbolize the cherries. For additional detail, incorporate a darker red or even a hint of glitter polish to add dimension. Subsequently, paint small green leaves adjacent to each cherry to finalize the appearance. You can either cluster the cherries or distribute them across each nail for a playful, fruity design.To amplify your patriotic spirit, consider adding tiny white stars or stripes in red and blue on accent nails, seamlessly integrating the cherry design into the 4th of July theme. Conclude your artwork with a glossy top coat to secure your design and enhance its shine. Cherry Nail Art is a joyful and distinctive method to commemorate Independence Day, infusing a touch of summer sweetness into your nail artistry! Revel in the celebrations with this delightful and fruity touch!
Simple Nail Design
A simple nail design is ideal for individuals seeking a chic and polished appearance without dedicating hours to elaborate artwork. This method emphasizes minimalism, allowing your natural beauty to be highlighted while still making a fashionable statement.To begin, prepare your nails by cleaning, shaping, and buffing them to ensure a smooth surface. It is crucial to apply a clear base coat, as it safeguards your nails from staining and provides a smooth foundation for the polish. For a timeless look, choose classic colors such as nude, soft pink, or light gray. These hues deliver a clean, understated elegance that is appropriate for any occasion.
Once the base coat has dried, apply two coats of your selected nail polish, ensuring that each layer dries completely. To add a touch of flair, you might consider including simple accents. A popular choice is to paint one or two accent nails with a contrasting color or metallic polish. For example, a classic nude base complemented by a gold or silver accent nail introduces a hint of glamour without overshadowing the simplicity of the design.
Another suggestion is to utilize striping tape to create clean lines or geometric patterns on a few nails. This can be achieved by applying the tape to a dry base coat, painting over it, and then carefully removing it before the polish dries.Conclude your simple nail design with a glossy top coat to enhance shine and durability. This minimalist approach is not only stylish but also versatile, making it suitable for both everyday wear and special occasions. Enjoy your effortlessly chic nails!
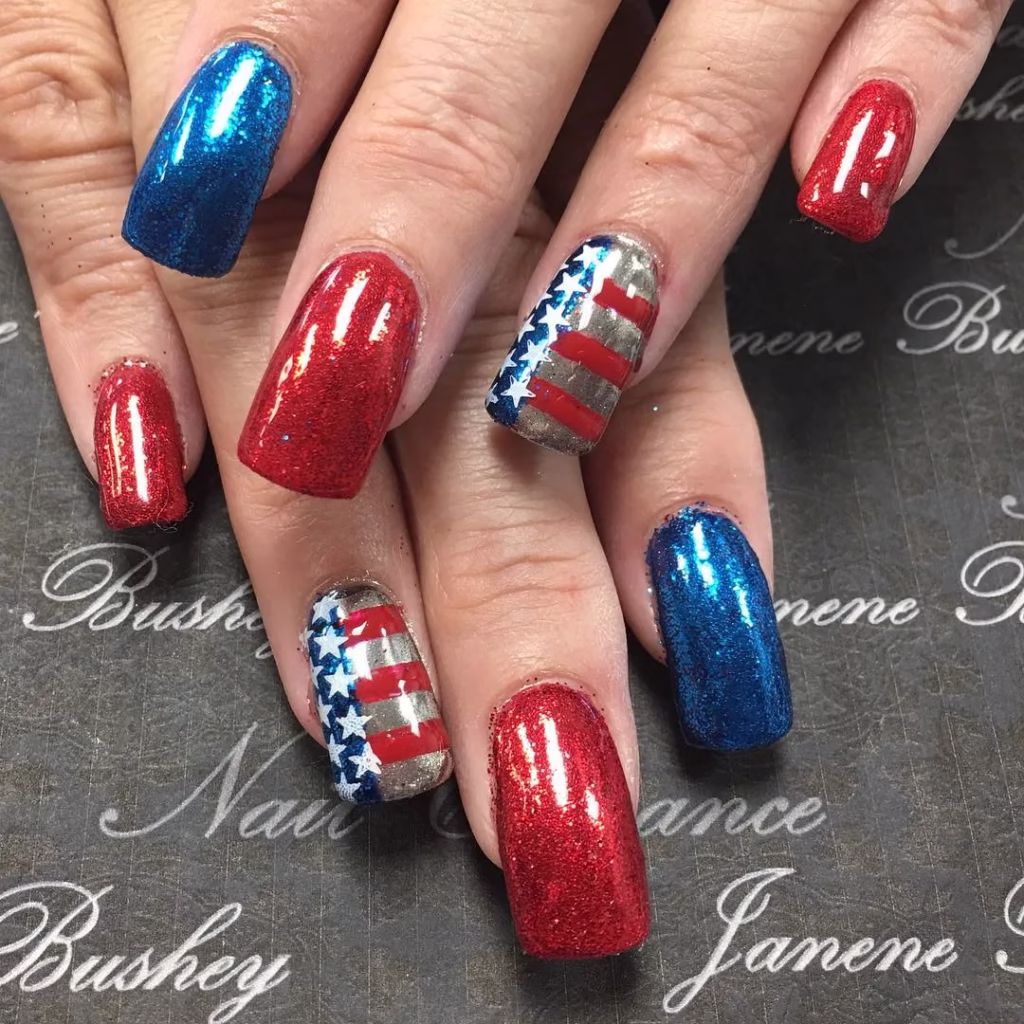
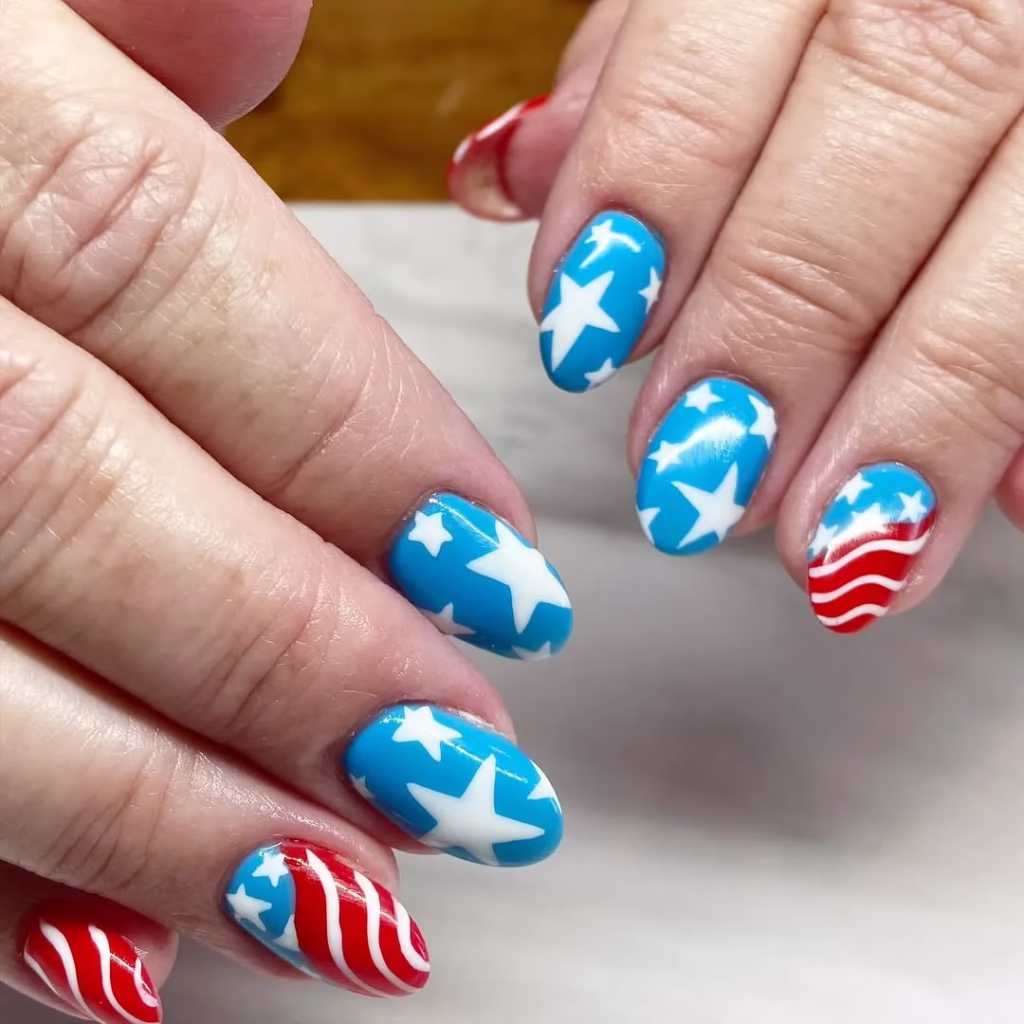
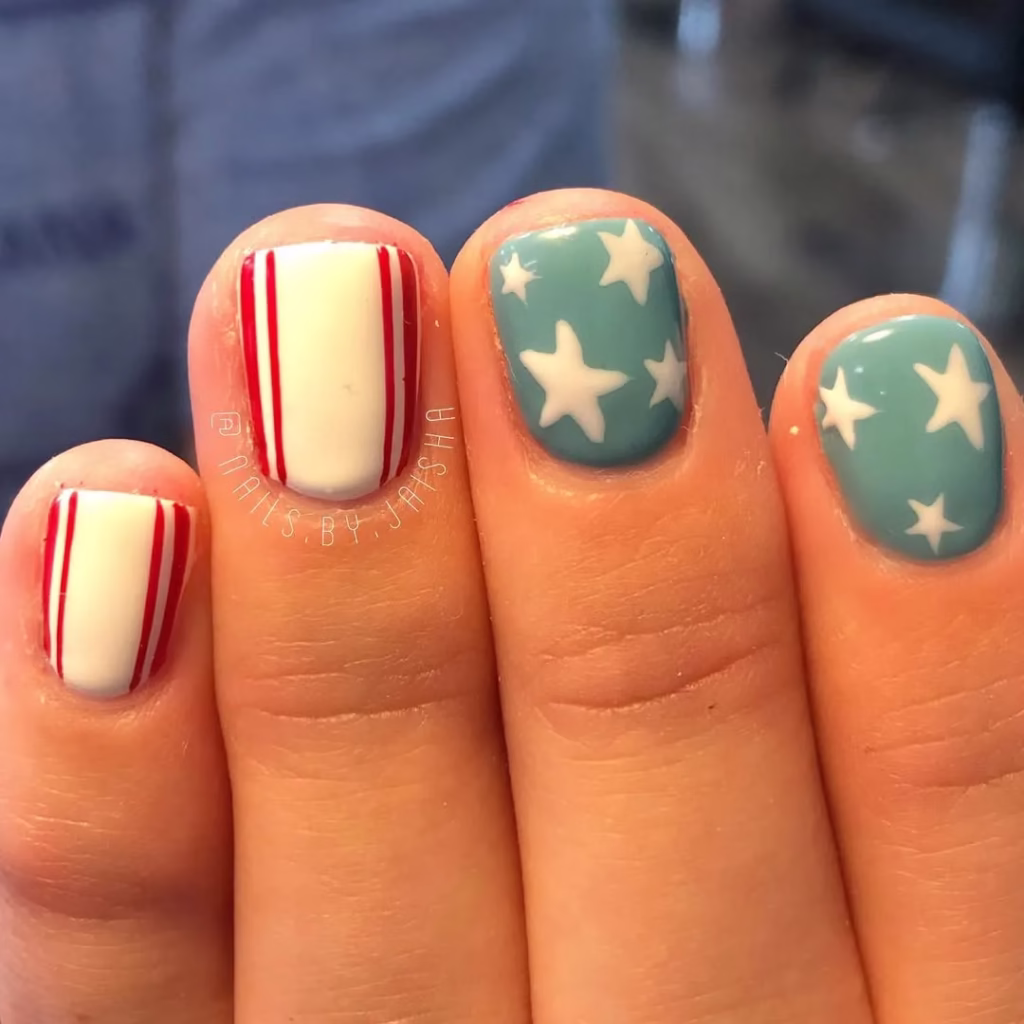
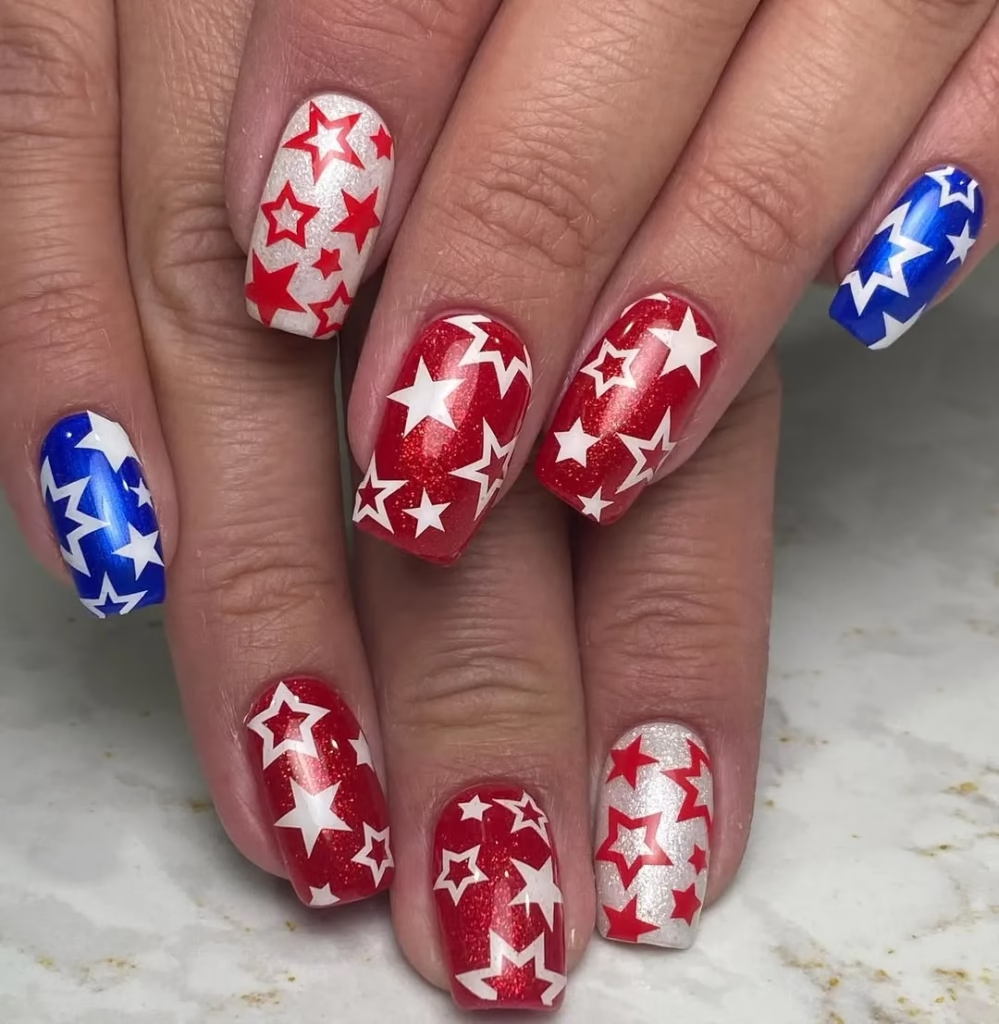
Stars and Stripes Nail Art
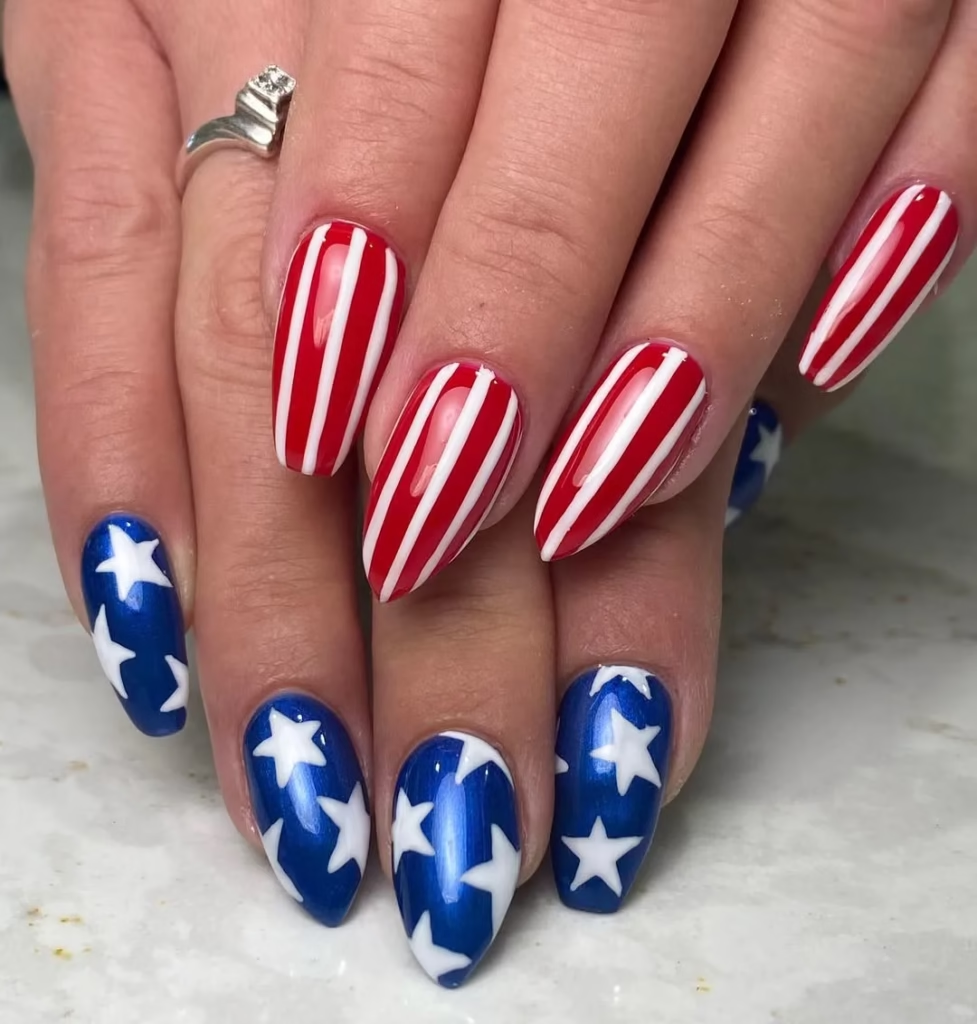
Commemorate Independence Day with a striking and festive Stars and Stripes Nail Art design that captures the spirit of the 4th of July! This visually appealing nail art integrates the classic components of the American flag—stars and stripes—into a playful and imaginative appearance that is ideal for displaying your patriotic enthusiasm.To start, prepare your nails by cleaning, shaping, and buffing them to establish a smooth surface. Apply a clear base coat to safeguard your natural nails. For the base colors, choose a traditional deep navy blue for accent nails and vibrant red or crisp white for the other nails. Apply two coats of your selected colors, ensuring each layer dries thoroughly.Once your base is set, it’s time to design the stripes and stars! For the striped nails, utilize striping tape to achieve neat, straight lines. You can alternate between red and white stripes, which reflects the appearance of the American flag. Simply tape off sections of the nail, paint over with the chosen color, and peel off the tape while the polish is still wet for a sharp finish.For the starry accent nails, employ a dotting tool or a fine nail art brush to create small white stars on the navy blue base. Alternatively, you can use star-shaped nail stickers for a quicker solution. Conclude your design with a glossy top coat to seal everything in and enhance the shine. Stars and Stripes Nail Art is a festive method to showcase your love for your country while maintaining a vibrant and fun style this July 4th! Relish the celebrations with nails that genuinely honor freedom!
Fourth of July Lips Nails
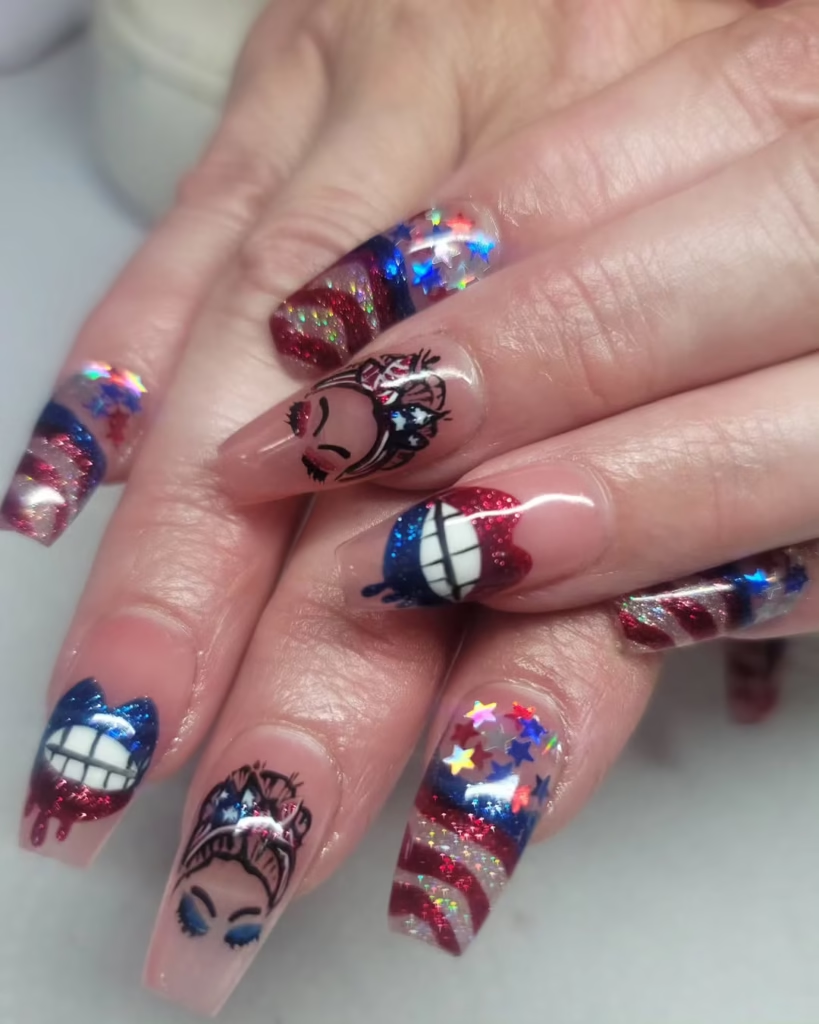
Celebrate Independence Day in a distinctive and fashionable manner with Fourth of July Lips Nail Art! This whimsical design merges the classic colors of the American flag with a playful lip motif, making it an ideal selection for those wishing to convey their patriotic spirit while demonstrating their creativity.To begin, prepare your nails by cleaning, shaping, and buffing them to achieve a smooth base. Apply a clear base coat to safeguard your natural nails. For the primary color, opt for a traditional red or white for a striking and festive appearance. Apply two coats of your selected base color, ensuring each layer dries thoroughly.Next, it is time to craft the lip designs! On one or two accent nails, utilize a fine nail art brush or a dotting tool to paint a pair of full lips. You may choose a classic red lip design or introduce a twist with a blue or glittery effect for an exciting pop. To enhance the detail, outline the lips in a darker shade to provide them with greater definition.To complement the lips, consider incorporating small stars or stripes around the design using white polish, capturing the essence of the 4th of July. Alternatively, you can create a gradient effect by employing a sponge to blend red, white, and blue on other nails.Conclude with a glossy top coat to seal your artwork and amplify the shine. Fourth of July Lips Nail Art is a creative and festive approach to celebrating the holiday, enabling you to express your individuality while embracing the spirit of freedom! Enjoy the festivities with nails that make a statement!
Stripes Nail Design
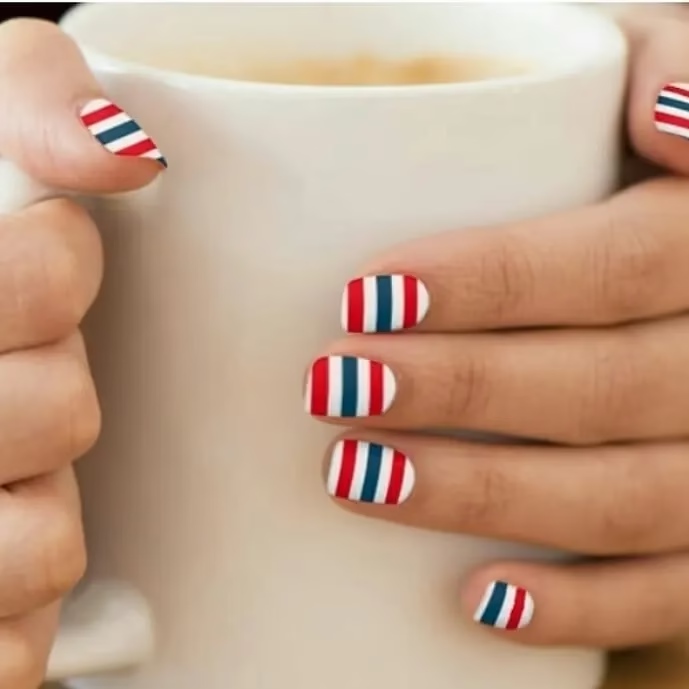
Prepare to dazzle this Independence Day with a lively Fourth of July Stripes Nail Design that captures the essence of patriotism! This playful and celebratory nail art reflects the spirit of the American flag, making it an ideal selection for commemorating the 4th of July in elegance.
To begin, ready your nails by cleaning, shaping, and buffing them to establish a smooth surface. Apply a clear base coat to safeguard your natural nails. For the base color, you may opt for a classic white to symbolize the flag or choose a deep navy blue for a bold background.
Once the base coat has dried, it is time to create those signature stripes! Utilizing striping tape is a superb method to achieve clean, precise lines. For a classic appearance, alternate between red and white stripes. Simply place the tape horizontally or vertically across your nails, paint over with red polish, and gently peel off the tape while the polish remains wet for a sharp finish. If you are feeling adventurous, consider diagonal stripes or even a combination of thin and thick stripes for a more dynamic look. You can also add a hint of glitter polish along the edges for extra sparkle. For accent nails, think about a navy blue base adorned with white stars, highlighting the flag’s starry motif. Conclude your nail design with a glossy top coat to seal everything in and amplify the shine. The Fourth of July Stripes Nail Design is a striking and festive way to honor the holiday, allowing you to express your creativity while celebrating your patriotic spirit. Prepare to flaunt your fashionable nails at all your July 4th celebrations!
Popcicle Nail Design
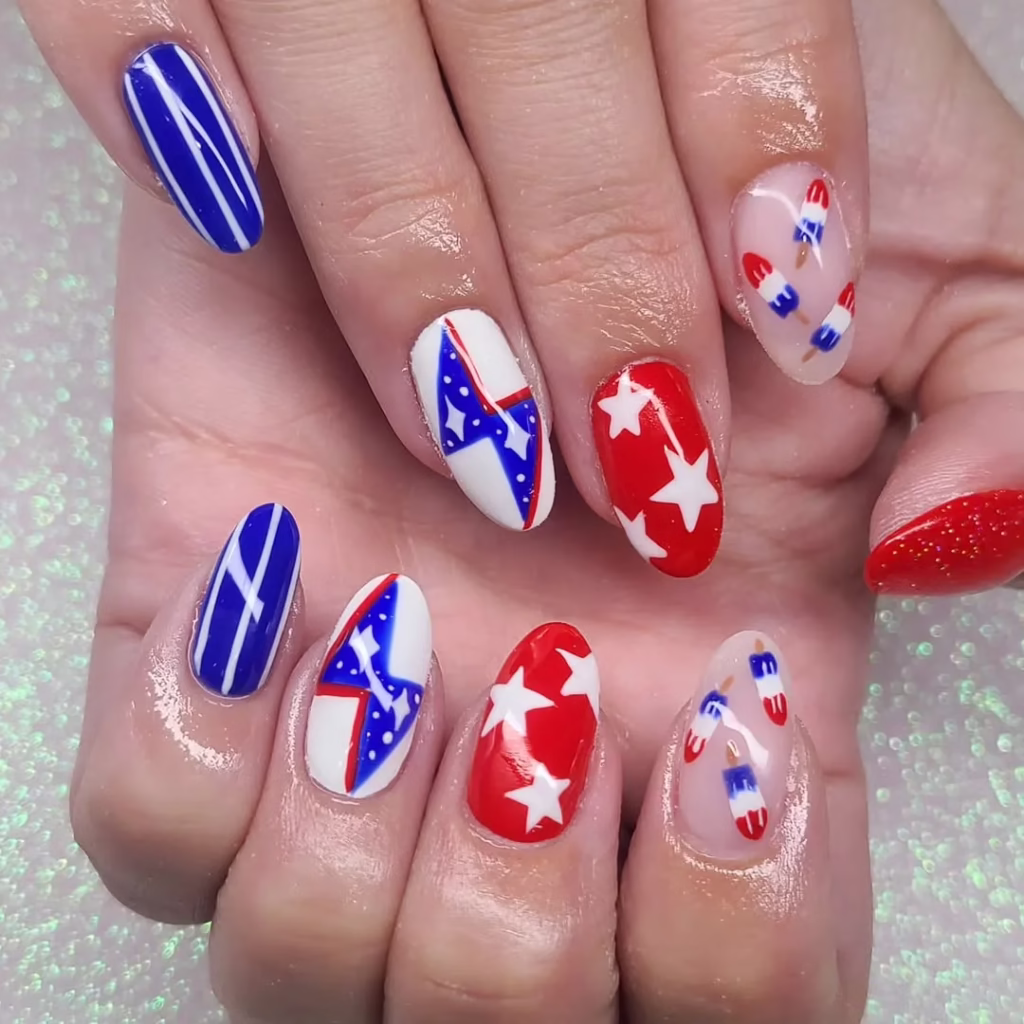
Celebrate Independence Day with a whimsical and invigorating Popsicle Nail Design! This delightful nail art embodies the spirit of summer and the pleasure of savoring popsicles on a warm July day, making it an ideal selection for your Fourth of July celebrations. Featuring vibrant hues and a creative flair, these nails are guaranteed to attract attention! To start, prepare your nails by cleaning, shaping, and buffing them to achieve a smooth surface. Apply a clear base coat to safeguard your natural nails. For the base colors, opt for bright red, white, and blue—the traditional colors of the American flag. Paint each nail in a different color, or alternate the colors for a lively appearance. Allow the base color to dry thoroughly. Once your base is dry, it’s time to craft the popsicle designs! On one or two accent nails, utilize a fine nail art brush to paint popsicles. Begin by sketching a rectangle for the popsicle shape and fill it in with a vivid color—red, blue, or even a combination. To add dimension, consider employing a lighter or darker shade to create a gradient effect. Don’t forget to include a stick for each popsicle by painting a small rectangle at the bottom in a light brown hue. For an additional playful element, you can sprinkle a bit of glitter to make the popsicles shimmer! Conclude your design with a glossy top coat to seal everything in and amplify the shine. The Popsicle Nail Design is a charming and imaginative way to commemorate the 4th of July, infusing a refreshing summer essence into your nails while displaying your festive spirit! Enjoy the holiday with this playful and colorful nail art!
Turquoise Trade Nail
Celebrate the allure of turquoise with Turquoise Trade Nail Art, an exquisite design that embodies the spirit of this lively color. Drawing inspiration from the deep-rooted history of turquoise gemstones in commerce, this nail art is ideal for individuals seeking to express their uniqueness while making a striking impression.To begin, prepare your nails by cleansing, shaping, and buffing them to create a smooth surface. Apply a clear base coat to safeguard your natural nails. For the base color, select a deep turquoise polish that captures the breathtaking shade. Apply two coats for a vivid and opaque finish, ensuring each layer dries thoroughly. Once the base color is completely dry, it is time to incorporate intricate designs that mirror the beauty of turquoise. Consider utilizing a fine nail art brush to craft geometric patterns or tribal motifs reminiscent of classic turquoise jewelry. You may add gold or silver accents to replicate the metallic features commonly found in trade items, introducing a touch of sophistication and contrast. For additional flair, employ a dotting tool to create small dots or decorative elements along the designs, enhancing the overall aesthetic appeal. If you are feeling bold, experiment with a gradient effect by blending turquoise with shades of blue or green for a more vibrant appearance. Conclude your design with a glossy top coat to secure everything in place and impart shine. Turquoise Trade Nail Art is a stunning and artistic method to express your admiration for this beautiful color while honoring its rich cultural heritage. Take pleasure in showcasing your uniquely styled nails that embody both elegance and creativity!
Sky Nail Design
Commemorate Independence Day with a whimsical Sky Nail Design that embodies the spirit of a clear, blue summer sky! This nail art is not only celebratory but also invokes sensations of freedom and serenity, making it an ideal enhancement to your 4th of July celebrations.
To begin, prepare your nails by cleansing, shaping, and buffing them to achieve a smooth surface. Apply a transparent base coat to safeguard your natural nails. For the base hue, select a gentle sky blue to symbolize the stunning summer sky. Apply two layers of this color, ensuring each coat dries thoroughly for a vivid finish.Once your base color has dried, it is time to create the sky effect! Utilizing a makeup sponge, dab on lighter shades of blue and white to form a cloud-like appearance. Carefully blend these hues to replicate fluffy clouds floating across the sky. For an added touch of shimmer, consider applying a hint of pearlescent or glitter polish on top, providing your nails with a magical sparkle.To further enhance the patriotic theme, add small white stars using a dotting tool or a fine brush on one or two accent nails, representing the starry night sky. You may also integrate red and white stripes as a tribute to the American flag on other nails for a unified appearance.Conclude your design with a glossy top coat to seal everything and impart shine. The Sky Nail Design is a creative and stunning method to celebrate July 4th, allowing you to showcase your individuality while embracing the essence of freedom. Enjoy displaying your sky-inspired nails at all your Independence Day festivities!
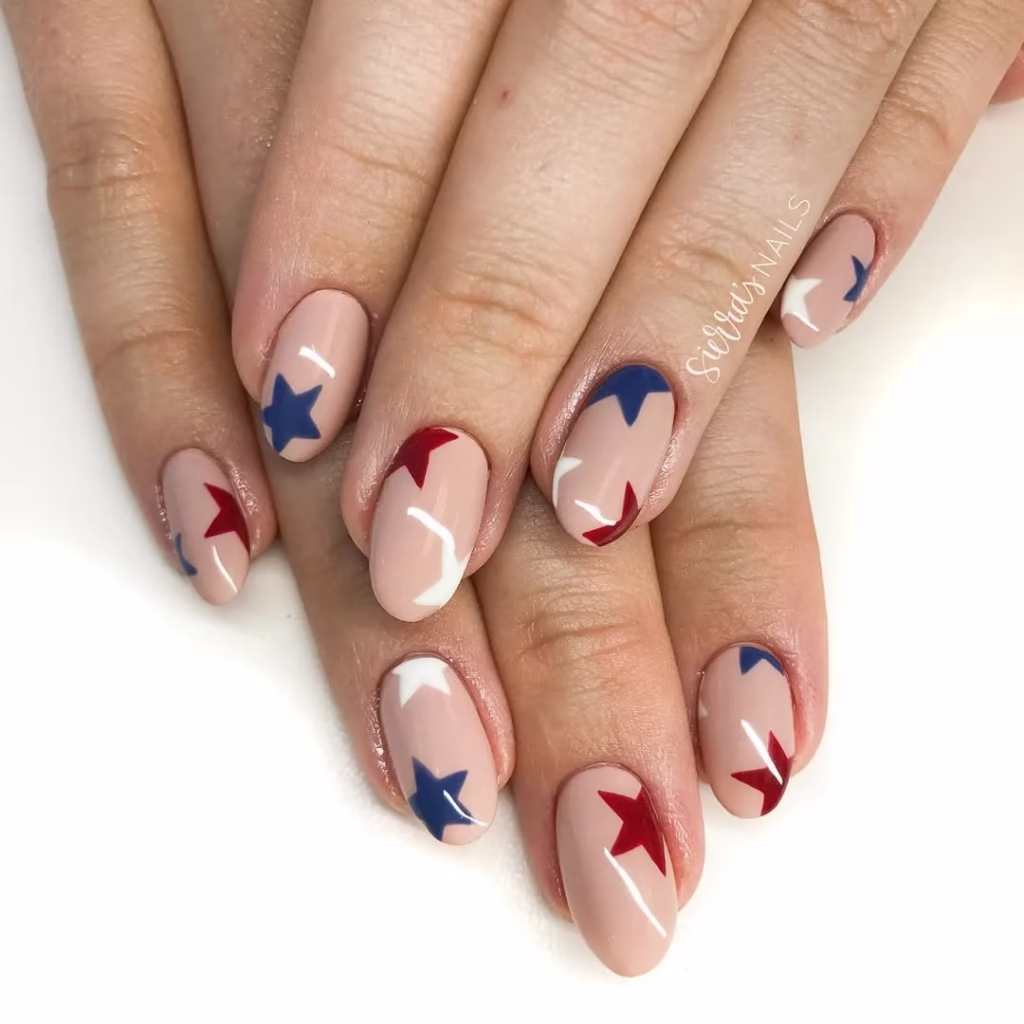
Stars Nail Art
Embrace the festive atmosphere of Independence Day with Stars Nail Art, which elegantly embodies the spirit of the 4th of July! This lively and colorful design is ideal for expressing your patriotic pride while infusing creativity into your nail art. To start, prepare your nails by cleaning, shaping, and buffing them to create a smooth surface. Apply a clear base coat to safeguard your natural nails. For the base colors, choose a classic deep blue to symbolize the night sky or bright red for a striking appearance. Apply two coats of your selected base color, ensuring that each layer dries thoroughly. Once your base is dry, it is time to craft the star designs! Utilizing a fine nail art brush or a dotting tool, paint small white stars on your blue base to replicate the starry night sky. You may vary the sizes of the stars for a more dynamic effect. Alternatively, you can opt for star-shaped nail stickers for a quicker and simpler solution. To enhance the design, consider creating a few accent nails adorned with stripes or a gradient effect in red and white, reflecting the American flag. This will establish a unified and festive appearance across all your nails. Conclude your design with a glossy top coat to secure everything and impart a lovely shine. Stars Nail Art is a delightful and creative method to commemorate the 4th of July, enabling you to showcase your artistic flair while paying tribute to your country. Celebrate the holiday with nails that shine as brightly as the fireworks illuminating the sky!
Pear Nail Art
Celebrate Independence Day with a distinctive and playful approach by integrating Pear Nail Art into your July 4th celebrations! This delightful design merges the refreshing essence of summer fruits with a festive touch, making it an imaginative option for those wishing to stand out during the festivities.To begin, prepare your nails by cleaning, shaping, and buffing them to create a smooth surface. Apply a clear base coat to safeguard your natural nails. For the base color, select a vibrant red or white to establish the foundation for your pear design. Apply two coats of your selected color, ensuring each layer dries thoroughly. Once your base is dry, it’s time to craft the pear designs! Utilizing a fine nail art brush, paint small pear shapes on one or two accent nails. Choose a bright green or yellow for the pears, adding a hint of brown for the stem. To provide the pears with more depth, consider adding highlights with a lighter shade and shadows with a darker hue. To amplify the festive theme, you can include small stars or stripes around the pears using red, white, and blue polish. This will connect the design to the patriotic spirit of the holiday. For an additional flair, think about applying glitter polish over the stars or around the edges of the pears for extra sparkle. Conclude your design with a glossy top coat to seal everything in and enhance the shine. Pear Nail Art is a delightful and imaginative way to commemorate the 4th of July, blending the joy of summer fruits with a festive twist. Enjoy displaying your unique and colorful nails at all your Independence Day gatherings!
Watermelon Nail Art
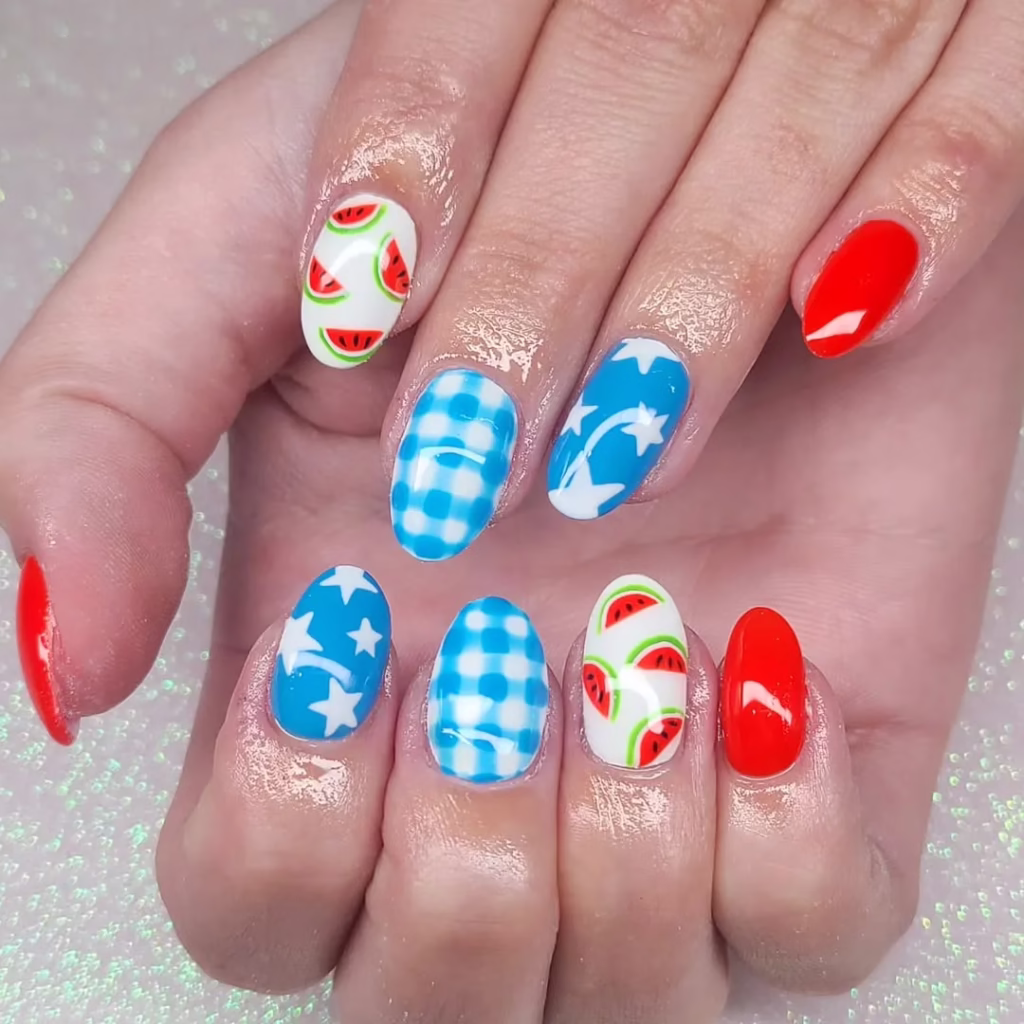
Celebrate the lively hues and invigorating atmosphere of summer with Watermelon Nail Art! This delightful and whimsical design is ideal for individuals looking to infuse a bit of fruity charm into their nails, making it a perfect selection for warm weather events or simply to uplift your spirits. To start, ensure your nails are clean, shaped, and buffed to establish a smooth foundation. Apply a clear base coat to safeguard your natural nails. For the base color, opt for a vibrant melon pink or coral to symbolize the succulent flesh of the watermelon. Apply two coats of this hue, allowing each layer to dry thoroughly for a solid finish. Once your base color is set, it’s time to craft the watermelon design! On one or two accent nails, utilize a fine nail art brush to draw a curved line near the tip of the nail with a dark green polish. This will depict the watermelon rind. Below this line, paint a semi-circle in a lighter green tone to add depth. Next, employ a dotting tool or a fine brush to place small black dots representing watermelon seeds along the pink area. For an additional creative flair, you may also incorporate some white or yellow highlights to replicate the texture of the fruit. Conclude your design with a glossy top coat to secure everything and enhance shine. Watermelon Nail Art is not only aesthetically pleasing but also a delightful way to embrace the joys of summer. Enjoy showcasing your fruity nails, perfect for picnics, beach outings, or any summer celebrations!
Subtle Stripes Nail Art
Celebrate Independence Day with grace and sophistication through Subtle Stripes Nail Art! This elegant design provides a tasteful method to incorporate the patriotic hues of red, white, and blue without being excessively bold, making it ideal for individuals who favor a more subtle appearance.To begin, prepare your nails by cleaning, shaping, and buffing them to ensure a smooth surface. Apply a clear base coat to safeguard your natural nails. For the primary color, select a soft white or light beige as your foundation, which will allow the stripes to be prominent while preserving a discreet look. Apply two coats of your selected base color, ensuring each layer dries thoroughly.Once the base is dry, it’s time to create the stripes. Utilize striping tape to achieve clean, precise lines. Position the tape horizontally or vertically across your nails, leaving gaps for the stripes. Paint over the exposed sections with red and blue polishes, alternating colors for a timeless patriotic appearance. Carefully remove the tape while the polish remains wet to ensure crisp lines.For an additional touch of elegance, consider applying a delicate glitter top coat over the stripes or around the edges of the nails to create a subtle shimmer effect. Conclude your design with a glossy top coat to seal everything in and enhance shine. Subtle Stripes Nail Art is a stylish and sophisticated way to commemorate the 4th of July, allowing you to express your patriotic spirit while keeping your nails elegantly understated. Enjoy displaying your fashionable nails at all your Independence Day celebrations!
July Berries Nail Art
Embrace the lively essence of Independence Day with July Berries Nail Art, a charming design that embodies the fresh and fruity spirit of summer! This nail art not only reflects the festive hues of red, white, and blue but also introduces a whimsical element that is ideal for 4th of July festivities.To start, prepare your nails by cleaning, shaping, and buffing them to achieve a smooth surface. Apply a clear base coat to safeguard your natural nails. For the primary color, select a vibrant red as the base for the majority of your nails, symbolizing the delectable strawberries and raspberries of summer. Apply two coats, ensuring each layer dries thoroughly for a striking finish.Once your red base is completely dry, it’s time to craft the berry designs! On one or two accent nails, utilize a fine nail art brush to paint small, round shapes in blue to represent blueberries. You may vary the sizes for a more organic appearance. Employ a dotting tool to add tiny white dots around the blueberries to replicate the look of fresh fruit.For an extra touch, consider adding small green leaves around the berries using a bright green polish. This will provide a refreshing contrast and elevate the overall design. Conclude your creation with a glossy top coat to seal everything in and impart a beautiful shine to your nails. July Berries Nail Art is a delightful and fruity method to celebrate the 4th of July, enabling you to express your creativity and relish the joyful spirit of summer at all your holiday gatherings!